Fujitsu AH52/DA LCD screen cracking, if there is a display failure in the liquid crystal, liquid crystal panel replacement (LCD replacement) is required!
[Fujitsu AH52/DA LCD repair and disassembly method STEP 1]
Ah52/DA is a standard laptop, so it is relatively easy to disassemble the LCD.If you are familiar with the decomposition as shown in the image, you can complete it in about 20 minutes, so please check in the following process.
Always remove the battery in any disassembly of the laptop first.In the case of LIFEBOOK AH54/DA, you can find the battery as soon as you turn the inside out of the main unit, and you can easily remove it by sliding the knob nearby.
From here, the liquid crystal side is disassembled, but it is necessary to remove the frame first to remove the panel.
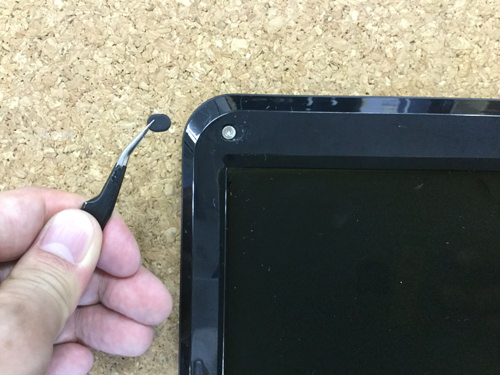
Because several screws are stopped in the frame, i use tweezers etc. as in the image and peel off the screw hidden (black rubber).
If you can remove the screw hidden, you will see the screw, so you will use the Phillips screwdriver.
There are four screws attached to the frame in total, but please remove all them.
If you can remove the screw of the previous, you will be able to disassemble the frame, but it is recommended because you can disassemble relatively smoothly if you use a tool (spatula) such as an image.
Since the frame itself is fixed inside with plastic claws, there are some hard parts, but if you understand the structure, you can easily remove it.
If you can remove the previous screw, you can knock the panel forward slightly, but you can see that there is a screw on the side.
All screws of this part are removed, but there are the same number of screws on the opposite side, so please remove all screws.
If you can remove all the screws, you can knock them down before, so let's slowly knock them down to the keyboard side!
There is a caveat when knocking down, but please do not break because the cable is connected to the back!
It becomes the back part of the panel, but you can see that the cable is connected to the place where it is surrounded by a red circle.
You can easily remove it if you slide it.
I think that i was able to remove only the panel from the laptop body if the decomposition up to this point can be done accurately, so after that, it will be completed if you replace it with the newly prepared parts.

 Fujitsu AH52/DA LCD screen cracking, if there is a display failure in the liquid crystal, liquid crystal panel replacement (LCD replacement) is required!
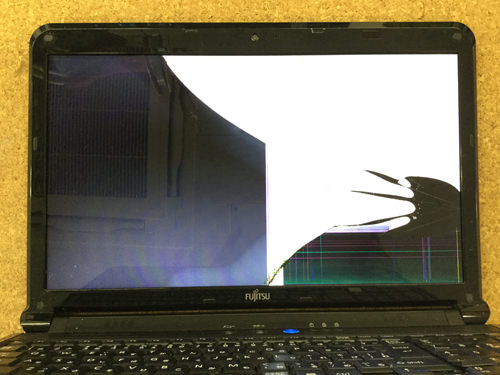


 From here, the liquid crystal side is disassembled, but it is necessary to remove the frame first to remove the panel.
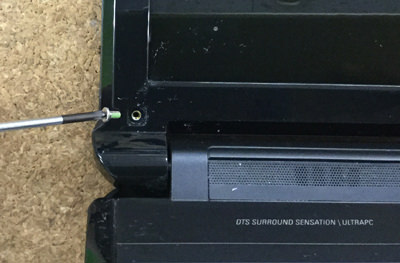
 If you can remove the screw hidden, you will see the screw, so you will use the Phillips screwdriver.
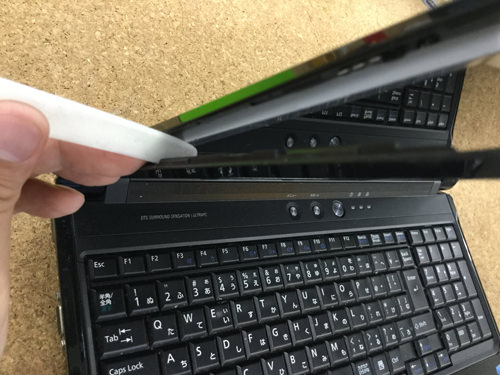
 If you can remove the screw of the previous, you will be able to disassemble the frame, but it is recommended because you can disassemble relatively smoothly if you use a tool (spatula) such as an image.
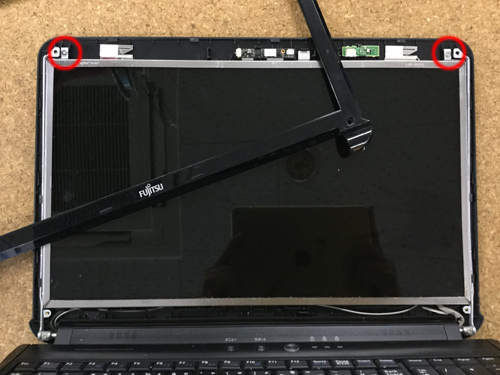
 After removing the frame, the entire panel will be visible, but there are screws in the red circle part, so let's remove it!
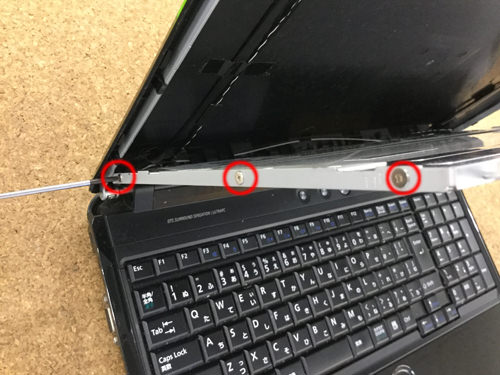
 If you can remove the previous screw, you can knock the panel forward slightly, but you can see that there is a screw on the side.
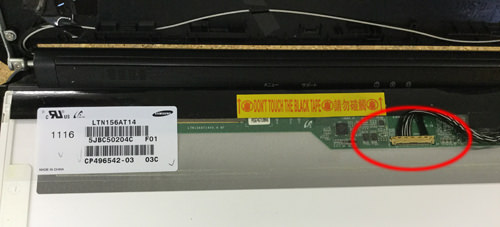


コメントを残す