How to repair and disassemble the MacbookProRetina A1502 Fan does not rotate, if you have heat
MacbookProRetina A1502 (13 inch) PC is hot, thermal runaway, cleaning, etc.
[MacbookProRetina A1502 FAN Replacement STEP 1]
If the fan is dusty, the PC may have heat or run away, but there is no good thing for the PERSONAL computer.
I think that there is a thing to inject into the FAN vent because it is possible to purchase an air duster easily at a consumer electronics mass merchandiser, but in fact, it is not so effective just pushing the dust around FAN into the inside.
After all, the effect is large if the FAN is removed and the cleaning is done by disassembling.
Please refer to this decomposition method because we have gone to the place to remove!
Let's remove the screw of the red frame part of the back side of the body with a Torx screwdriver!
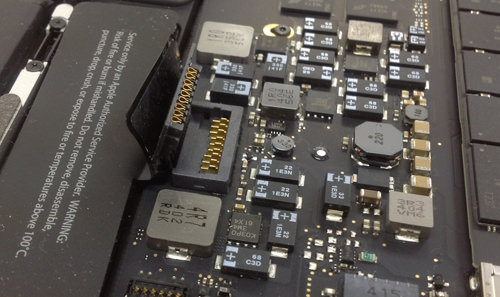
[MacbookProRetina A1502 FAN Replacement STEP 2]
Before removing the FAN, remove the battery connector first.
Failure to do this may lead to short-circuiting of your computer.
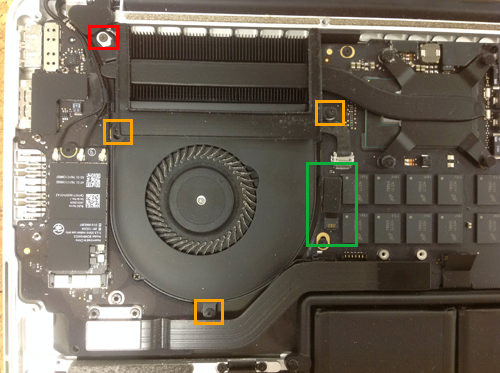
[MacbookProRetina A1502 FAN Replacement STEP 3]
Fan is connected by the screw of the orange frame and the connector of the green frame, but I want to do it at the same time because it is necessary to remove the heat sink to remove the FAN.
Remove the screws on the orange part and the red frame first.
Next, it is a green frame part, but you can remove it by lifting the claws of the small connector first and then pulling out the cable.
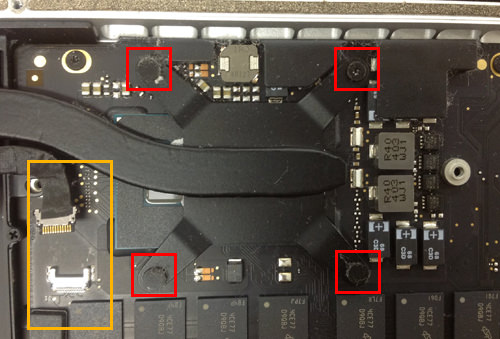
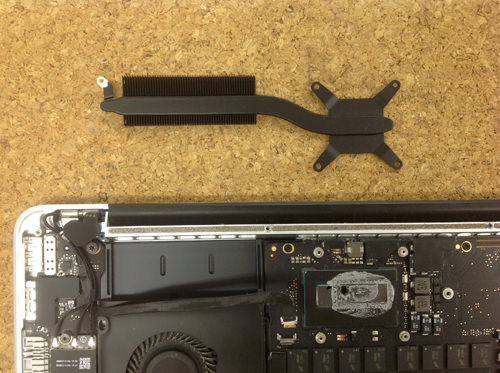
[MacbookProRetina A1502 FAN Replacement STEP 4]
This is the heat sink, but the cushion rubber is on the screw in the red frame.
When peeled off with tweezers, the screws will come into view, so remove all screws after peeling off the rubber.
The place of the orange frame becomes a camera cable, but let's remove it because it is easy to do if you remove it!
[MacbookProRetina A1502 FAN Replacement STEP 5]
The heat sink was able to be removed.
I think that it is possible to confirm that grease remains on the lower side that I removed, but it is also a part that does not take it off easily, so it is good to inject it again after removing the grease cleanly.
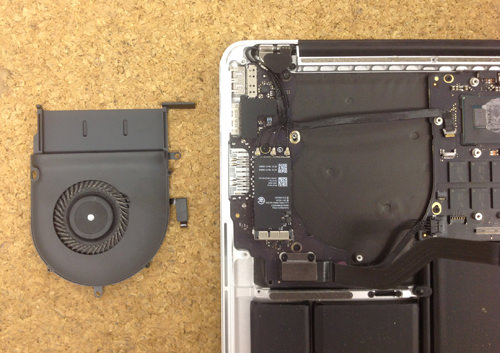
[MacbookProRetina A1502 FAN Replacement STEP 6]
If you can remove the heat sink, you can remove the FAN as it is!
If you look at the feather part of the fan, you will understand, but you can see that there is dust.
This part can remove dust well when lightly brushed with a soft toothbrush.
In addition, if you have an air duster, please try it because there is an effect to inject it after this state!
By the way, 13 inches of MacbookProRetina such as A1502 will be one FAN, but 15 inch models such as A1398 have become two.

 MacbookProRetina A1502 (13 inch) PC is hot, thermal runaway, cleaning, etc.
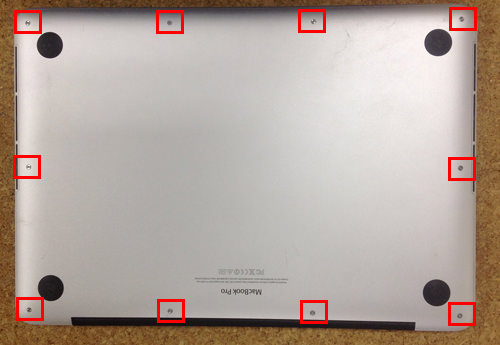


コメントを残す