
IPadAir2 battery does not have, reduces quickly, how to repair expansion, disassembly method
How to replace the iPadAir2 battery yourself
- I will publish the decomposition method which will be helpful in case of battery failure, the battery of the iPadAir2 becomes bad, but the necessary tools will be suction cups, spatula, etc., so please prepare each one.
- If you see that the battery is expanding when you look at the screen from the side, the battery needs to be replaced, but the disassembly of the iPadAir2 must always remove the liquid crystal (touch panel) than when you purchase it. Be careful not to break the screen.
If the touch panel and lcd panel are integrated, it will cost an additional part fee of 10,000 yen or more if it is divided.
I think that it is possible to refer to any tool used in this disassembly for a few hundred yen in the home center etc., but the tool that should be the most is a heat gun.
Heat guns may be easy to understand when it comes to the powerful things of a dryer, but they help remove double-sided tape on the touch panel.
- [iPadAir2 Battery Replacement STEP 1]

The battery of the iPad Air 2 is built-in, so you need to remove the screen.
In terms of images, strong tape is attached to the white part, so it becomes an image that heat is applied to the part and the double-sided tape is softened.
- [iPadAir2 Battery Replacement STEP 2]

- Since the battery cannot be removed unless the liquid crystal is removed, we will remove the liquid crystal first.
Please refer to how to remove the LCD because it is open to the public by iPadAir2 LCD exchange.
The most time-consuming disassembly of iPadAir2 is the process of removing the LCD, but if you break down forcefully in order to shorten the time, you will break the screen, Let's spend the most time on the work of removing the screen because there is a thing that it is necessary to do other than the battery replacement which is the purpose of this time.
It is not easy to remove the liquid crystal, but it is necessary to take about 80% of the total time to work, so try to disassemble carefully.
- [iPadAir2 Battery Replacement STEP 3]

-
- Since the connector of the battery is on the logic board side, remove the screw of the red circle part.
The orange color is a connector of the liquid crystal, so it is possible to remove the liquid crystal if you remove it.
You can remove the silver plate by removing the orange screw, but since the connector of the liquid crystal is connected to the inside, it is possible to remove it easily if you pull it out from the bottom to the top.
- Since the connector of the battery is on the logic board side, remove the screw of the red circle part.
- [iPadAir2 Battery Replacement STEP 4]

- The LCD was able to be removed from the iPadAir2 body.
Store the LCD side so that it is not used until the battery replacement is complete.
- [iPadAir2 Battery Replacement STEP 5]

- In this decomposition, parts attached to the surroundings, such as logic boards, are dared to be removed so as to be easy to understand.
Since the battery is fixed with a powerful double-sided tape to the main body, we remove it so that it can be inserted into the lower, such as the spatula used in the image.
It is slightly stiff when you insert the spatula at first, but in that case, it is easy to remove the double-sided tape because it softens when heat is applied with a dryer etc.
It is recommended because it is slippery when the alcohol used for disinfection etc. is attached to the tip of the spatula and it slides.
If you apply heat, do not apply it directly to the battery, but to apply it to the apple mark side of the rear panel.
- [iPadAir2 Battery Replacement STEP 6]

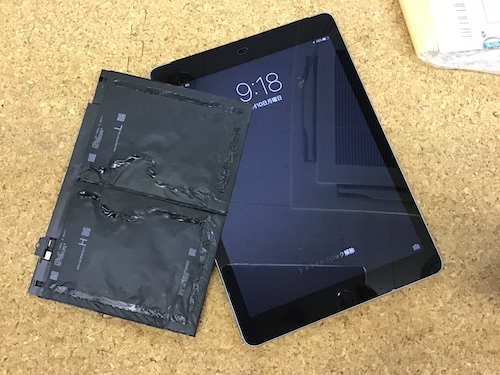
- Only the battery can be removed from the iPadAir2 unit.
If you look closely at the lower right part of the battery alone, there is a gold projection, but this part becomes the red circle part that was removed in the process of [STEP 4].
If you remove the battery without removing the logic board, it is necessary to pull out the connector part of the battery by floating the logic board lightly, but if you are not familiar with the disassembly, it is more reliable to remove the logic board and then replace the battery.
- [iPadAir2 Battery Replacement STEP 7]

- The battery of the image is a genuine battery removed from iPadAir2.
The battery used to replace the battery must contain the PSE mark, but use the same thing and voltage.
If you apologize and install the wrong thing, it may lead to other breakdowns, so be careful. - In addition, the battery of the iPadAir2 is not readily available, but you can buy it overseas.
However, there is also a battery that seems to be a fake, so if you are worried, we recommend that you consult a repair shop in Japan.
Even if it can be installed in the case of a fake, the battery level is lost immediately, and excessive voltage is supplied, and it leads to damage to the iPad, so please be careful!
For battery expansion, iPadAir2 battery replacement!
The light leaks when seen from the side.
When I investigated that the reaction of the touch was dull, I was able to confirm that the battery itself was expanding.
After the battery replacement, the work was finished because it was possible to store the liquid crystal without being able to make a gap!
I was surprised that the iPadAir2 was on display at a consumer electronics retailer, but it was in flat.
I've seen this scene three times besides, so the battery of the iPadAir2 is easy to expand.
If you use it while it expands, the liquid crystal may crack, so be careful.
If the LCD appears to be raised from the side of the iPad, the battery may be inflated, so please consult a repair shop.


コメントを残す