ACER Aspire5336 LCD cracking, screen replacement repair method, disassembly method

 If you have a cracked LCD screen or a malfunction in the display of the ACER Aspire5336, please refer to it.
- [ACER Aspire5336 LCD repair and disassembly method STEP 1]
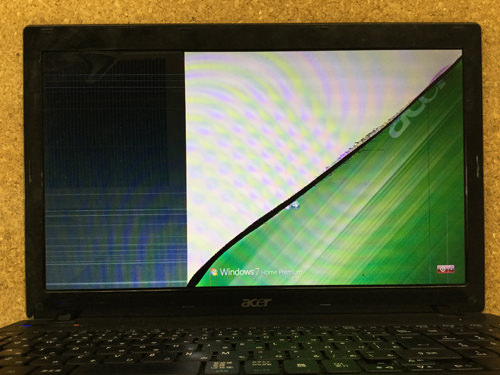

Because the liquid crystal is cracked, there is a crack at an angle, and the display is defective.
In this case, it is necessary to perform a liquid crystal exchange, but it seems that there is no problem with the data because it is underused that Windows itself is starting normally.
- [ACER Aspire5336 LCD repair and disassembly method STEP 2]
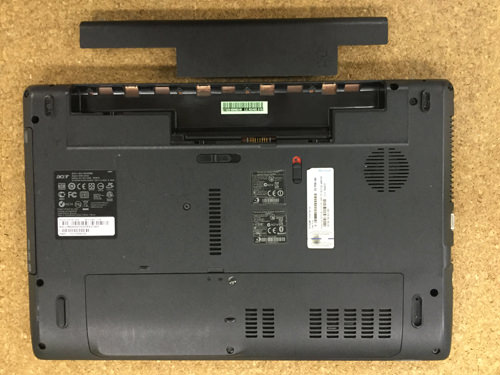
 First, turn the battery over and remove the battery.
In the case of the Aspire 5536, the battery comes off by sliding the knob near the battery.
- [ACER Aspire5336 LCD repair and disassembly method STEP 3]

 From here, the liquid crystal side is disassembled.
To remove the LCD panel, it is necessary to remove the frame in front, so first remove it.
The screw is hidden in the lower left and lower right, and a seal called screw concealation is attached as shown in the image.
Because it can be easily peeled off by using a sharp tool such as tweezers, remove the screw with a Phillips screwdriver.
- [ACER Aspire5336 LCD repair and disassembly method STEP 4]
 If the screw can be removed, the frame will be disassembled, but it can be easily disassembled by using a tool such as an image.
This work can be removed by doing this work around the liquid crystal for one autumn.
- [ACER Aspire5336 LCD repair and disassembly method STEP 5]
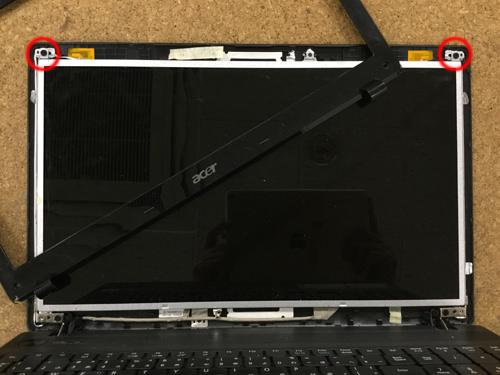
 I think that the entire liquid crystal was seen when the frame can be removed, but it is fixed with a screw to the red circle part, so I remove it.
- [ACER Aspire5336 LCD repair and disassembly method STEP 6]
 If you can remove the previous screw, you can put the panel in front a little bit, so all the screws on the side will be removed.
This part is on both sides, so don't forget to remove it.
When all screws can be removed, the LCD panel will be able to move, so let it sleep to the keyboard side.
- [ACER Aspire5336 LCD repair and disassembly method STEP 7]
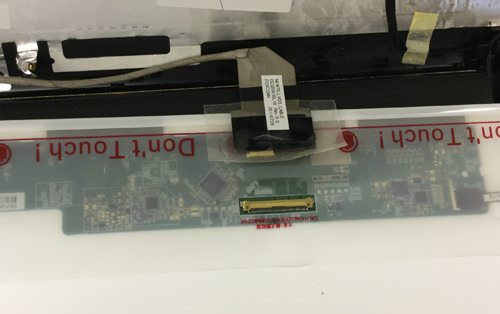
 The cable is connected to the back of the LCD panel, so remove it carefully so as not to damage it.
The cable can be easily removed by sliding it.
- [ACER Aspire5336 LCD repair and disassembly method STEP 8]
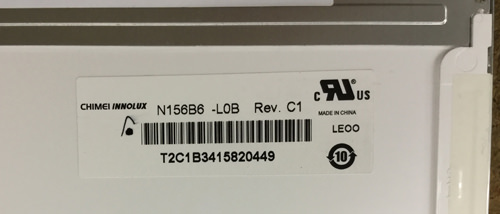 The model number of the LCD panel used is N156B6-L0B Rev.C1.
- [ACER Aspire5336 LCD repair and disassembly method STEP 9]
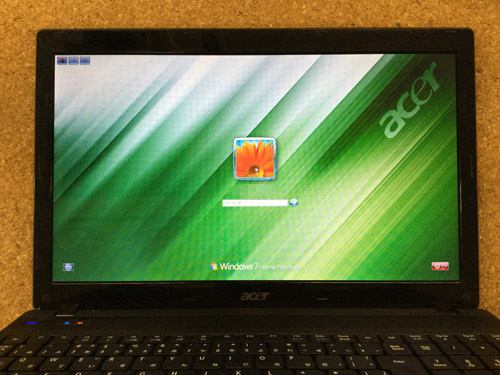 It is in the state that the power is turned on after the replacement to the new panel, but you can see that it is starting normally.
The repair of the liquid crystal crack is completed by this.


コメントを残す