MacbookAir A1369 LCD cracking, screen replacement repair method, disassembly method

 Repairs on MacbookAir 13 displays with cracked LCD or poor display
The new MacbookAir 2018, which is decided to be released on November 7, 2018, has changed significantly when compared to the model from 2017 years ago.
There is an impression of the good that the touch ID of the new Macbook Pro is added to the thickness of the Macbook 12.
We will also publish how to disassemble the MacbookAir 2018 model, so please wait for a while.
20,000 yen in 11 inches if MacbookAir of 2010 to 2017 model,
LCD repair is possible at the cost (total amount) of 30,000 yen late in 13 inches!
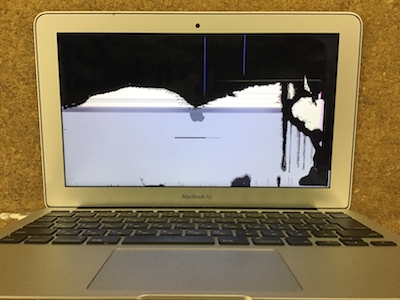
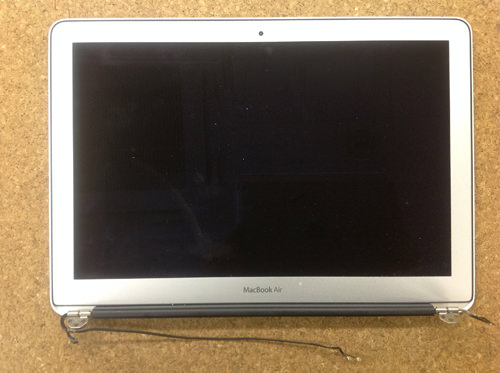
The following image is the liquid crystal crack of the Macbook Air that you asked us.
It is necessary to change the LCD because the entire screen is no more visible,
It is a repair method to replace each liquid crystal upper body in the manufacturer, but we can repair cheap lying because only the liquid crystal panel can be replaced!
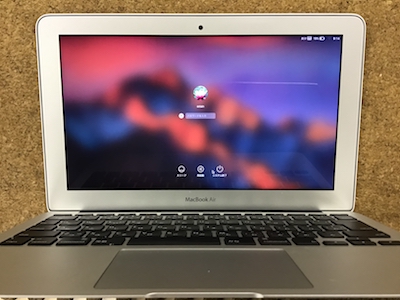
We are replacing only the LCD panel of MacbookAir, but I think that it is understood that it came to be reflected normally.
When we exchange the LCD of MacbookAir, we will return it as it is without touching the data, so you can use it immediately without setting it up after returning it!
Please refer to it because you can see what kind of MacbookAir repair is doing below!
[MacbookAir A1369 LCD panel replacement and repair method STEP 1]
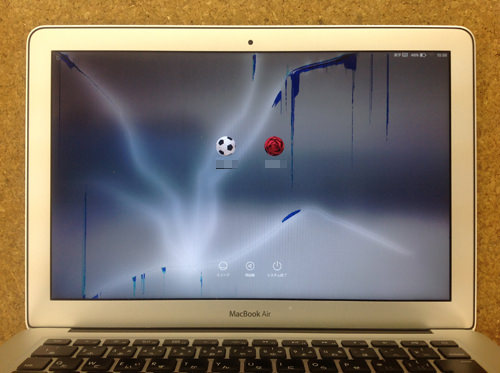
It is a case where the thing hits the liquid crystal part and the crack enters inside, and the muscle and the leak spread from there in all directions.
Since the OS starts normally and becomes a normal login screen, there seems to be no problem with logic board or hard disk (SSD).
If you replace the liquid crystal parts, you can use MacBookAir in the same environment as before, so let's proceed with the repair.
The repair method of the liquid crystal replacement of MacBookAir is different in the manufacturer and the repair shop, and it is a method only to replace the panel of the display part which is cracking and the replacement of each upper body.
In this case, because there was no other damage, we will replace only the panel, but even if you replace the upper body, the procedure is the same part of it, so it seems to be helpful.
Please consult a shop that can respond if you feel that it is difficult to see the flow of the following repair because the difficulty of the liquid crystal repair of Macbook Air is very high.
[MacbookAir A1369 LCD panel replacement and repair method STEP 2]
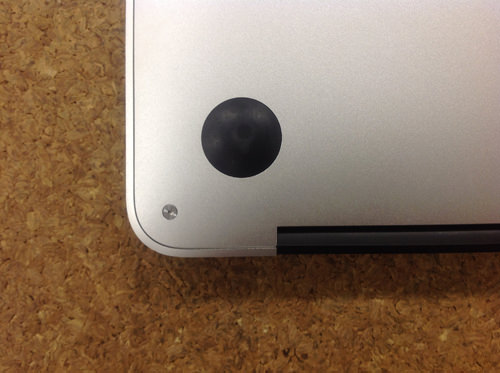
First, remove the battery connector and then work.
The MacBookAir cannot remove the battery connector unless the bottom case (back lid) is opened because the battery is built-in.
Remove all 10 screws on the back of the main body.
Because of the special shape called Torx, it is not possible to remove it with a Phillips screwdriver, but a driver called a Torx screwdriver is sold at the home center and website, so please prepare it in advance.
[MacbookAir A1369 LCD panel replacement and repair method STEP 3]
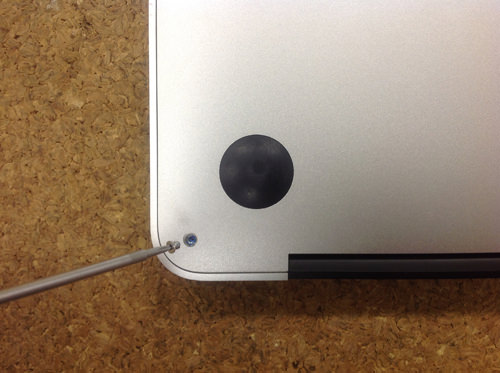
While disassembling the MacBookAir, let's prepare in advance because the Torx driver is always necessary.
Remove all 10 Torx screws in the bottom case (back lid), but be sure to use a screwdriver that matches the size.
If you try to open it forcibly, the thread will collapse and you will not open it.
[MacbookAir A1369 LCD panel replacement and repair method STEP 4]
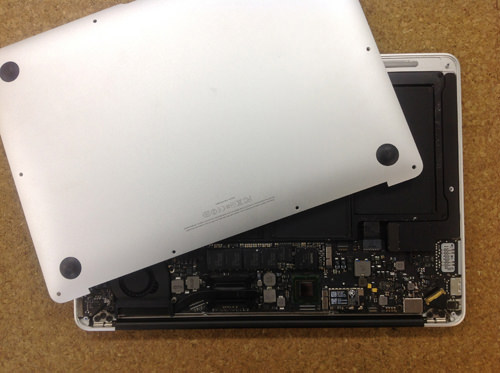
Remove all screws to remove the bottom case.
If you have been liquid or submerged in the past, it may be stuck inside, but the bottom case can be removed if all screws are removed.
[MacbookAir A1369 LCD panel replacement and repair method STEP 5]
When repairing a PC, the first thing you need to do is to cut off the energization, so pull the knob on the battery connector and remove it.
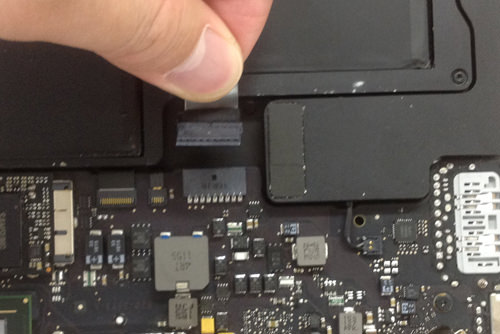
[MacbookAir A1369 LCD panel replacement and repair method STEP 6]
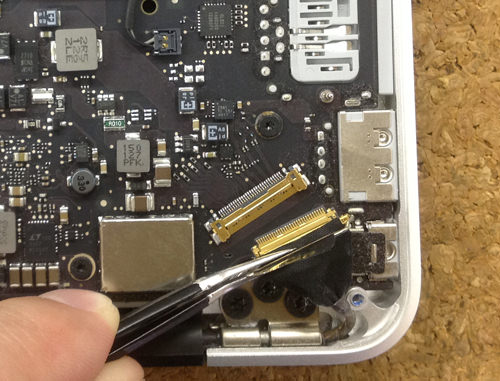
Next, remove the connector of the LCD cable that connects the LCD panel to the logic board.
You can easily remove the "co-shaped" pin by raising it up and pulling it out.
[MacbookAir A1369 LCD panel replacement and repair method STEP 7]
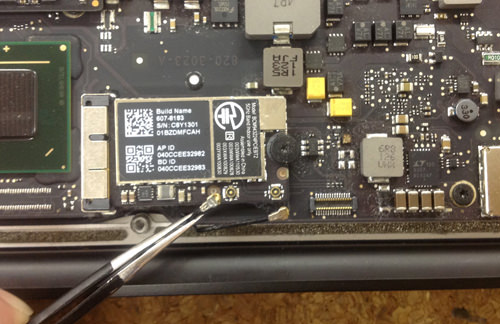
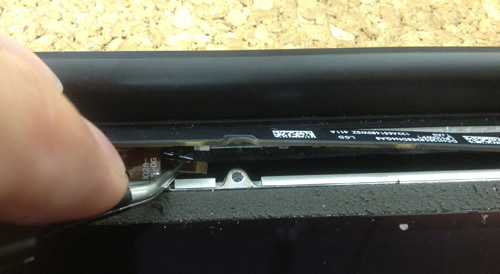
After that, the WiFi cable is removed, but since it has a delicate structure, carefully remove two places so as to lift from the knob to the top with tweezers.
[MacbookAir A1369 LCD panel replacement and repair method STEP 8]
Next, the WiFi cable is stuck in the groove inside the top case, so remove the cable cover so that it doesn't scratch.
[MacbookAir A1369 LCD panel replacement and repair method STEP 9]
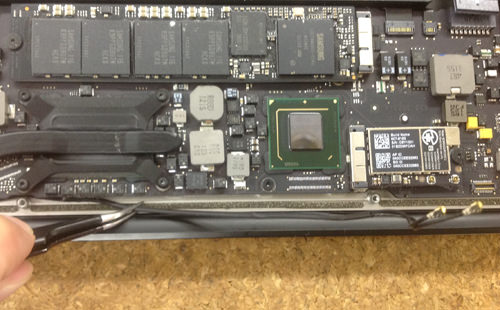
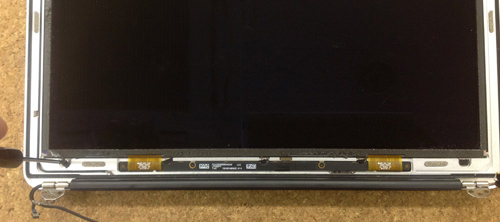
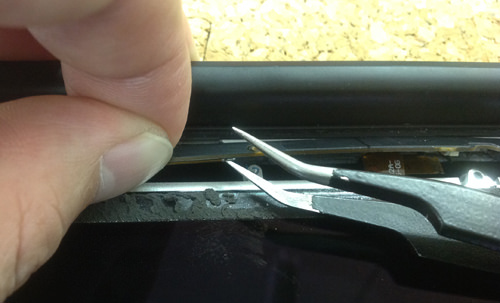
There is a webcam in the upper center of the LCD, and the cable is connected to the power board, so you can easily remove it by sliding it so that it pulls forward.
The camera cable is very thin and should not be broken.
If you cut it off, you will not be able to use the camera.
[MacbookAir A1369 LCD panel replacement and repair method STEP 10]

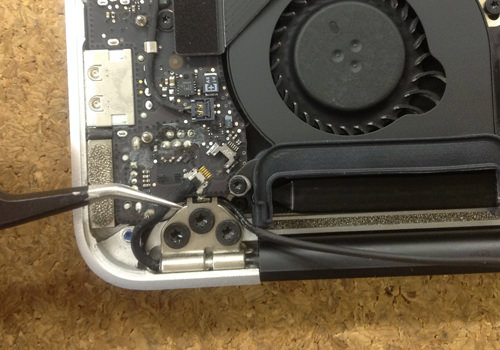
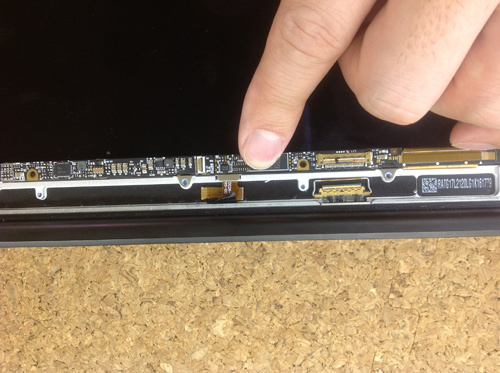
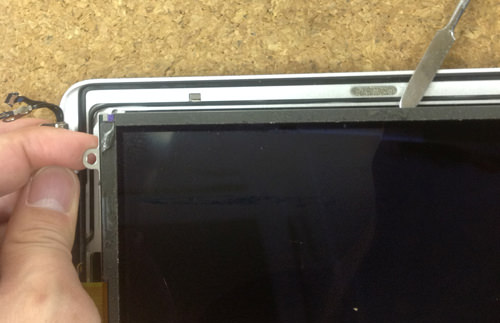
Next, there are three screws on the left and right hinges of the connection point of the main body and the lcd upper body, so let's remove all screws, but let's use the Torx screwdriver instead of the Phillips screwdriver.
[MacbookAir A1369 LCD panel replacement and repair method STEP 11]
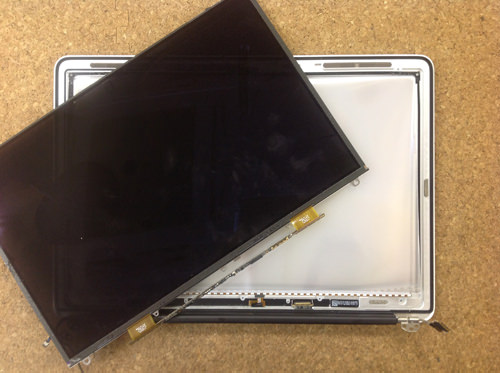
Finally, we were able to remove the upper body of the MacbookAir, but when replacing the upper body of the LCD, the decomposition is finished in the process so far.
Let's undo it by the reverse procedure after the exchange.
This time, we will proceed with further disassembly because it is only a replacement of the panel of MacbookAir, but let's work carefully because it is not an exaggeration to say that it is production from here!
[MacbookAir A1369 LCD panel replacement and repair method STEP 12]
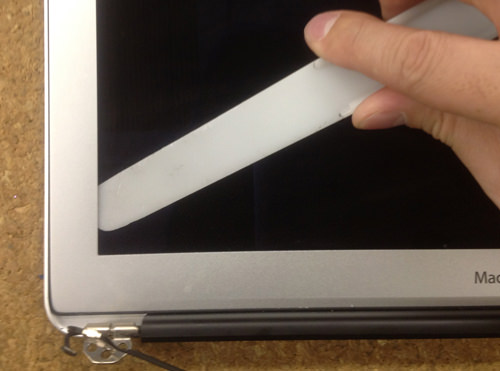
The silver bezel, which is described as the MacBookAir, is glued with strong double-sided tape to avoid damaging the webcam body or other cables. Using a plastic spatula, etc., it moves parallel to the surface of the panel to peel off the adhesive surface.
It is smooth when peeling clockwise from the lower left to the top toward the image.
[MacbookAir A1369 LCD panel replacement and repair method STEP 13]
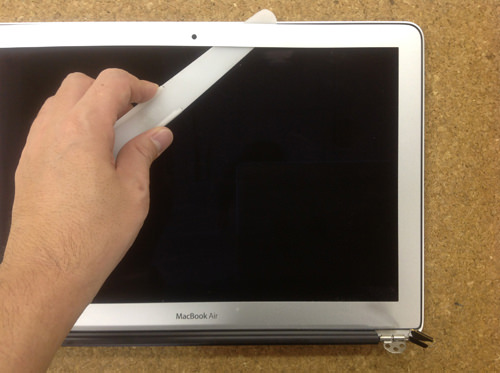
In some places, the adhesion is strong and there are some difficult places, but since the bezel peeled off of the MacbookAir is reused, it will be peeled off over time so as not to bend or distort carefully.
If the bezel is hard to remove, it is easy to peel off when heat is applied with a heat gun, a dryer, etc., but please note that the bezel itself is also easy to bend.
[MacbookAir A1369 LCD panel replacement and repair method STEP 14]
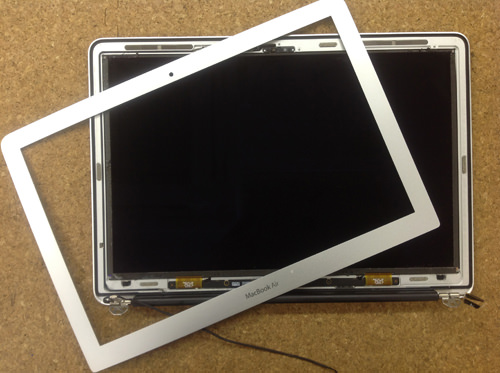
The bezel can be removed by peeling off all the adhesive surfaces.
It is also important to check whether you are scratching a webcam or wiring at this time.
[MacbookAir A1369 LCD panel replacement and repair method STEP 15]
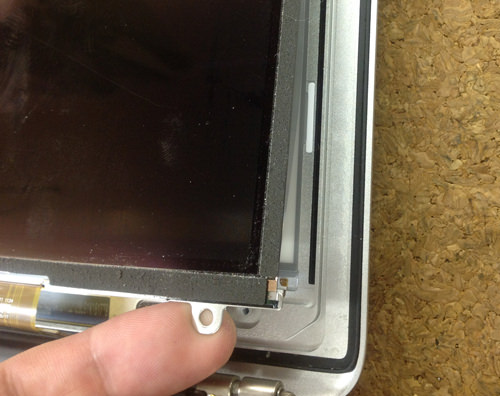
The lower part of the panel is a positive screw and five places are stopped.
There is a black tape on the screw, but you can remove all using the screwdriver even if it is intact.
[MacbookAir A1369 LCD panel replacement and repair method STEP 16]
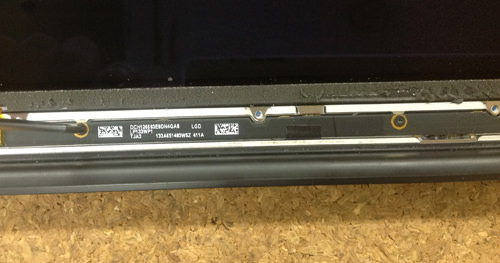
Next, two positive screws are stopped in the base part of the panel, so remove it.
[MacbookAir A1369 LCD panel replacement and repair method STEP 17]
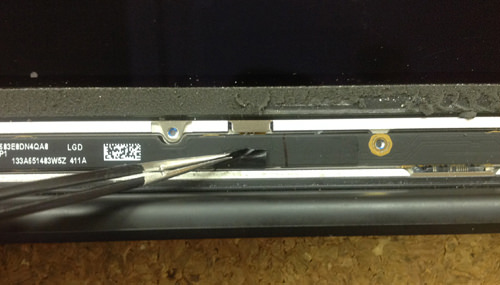
Black tape is attached to the base part in the image, but this is a tape that is holding off the backlight cable, so we carefully peel it off using tweezers.
[MacbookAir A1369 LCD panel replacement and repair method STEP 18]
Next, it is difficult to understand in the image, but the orange backlight cable is connected to the white small connector on the back of the base lightly lifting the base and the back side.
Because it stops with a black pin in a white connector, I splash it with tweezers etc.
[MacbookAir A1369 LCD panel replacement and repair method STEP 19]
Next, the cable will come out of the connector, so work slowly and carefully to remove the cable from the connector so as not to damage it.
[MacbookAir A1369 LCD panel replacement and repair method STEP 20]
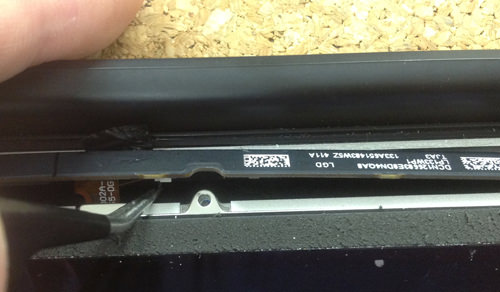
Next, it becomes a more difficult task, but since the liquid crystal cable is connected to the back of the base, in the image, the pin of the "co-shaped" type is lowered down with tweezers, etc., and the cable is pulled out from the board by pulling it out to the back.
[MacbookAir A1369 LCD panel replacement and repair method STEP 21]
If you work carefully, you can remove cables from the base of the panel in this way.
[MacbookAir A1369 LCD panel replacement and repair method STEP 22]

Looking forward to the base of the panel, use a small spatula or a small flat-blade screwdriver from the front side of the right hand, and the liquid crystal panel stops with strong adhesive tape, so slowly and carefully peel off the LCD panel so that it does not break.
[MacbookAir A1369 LCD panel replacement and repair method STEP 23]
Gently peel off the adhesive while gently lifting the base side of the panel.
Even if the liquid crystal panel breaks here, it is good to replace it, but the fine glass fragments remain and the trouble of cleaning is extra, so carefully doing it will make the work easier later.
[MacbookAir A1369 LCD panel replacement and repair method STEP 24]
When one side is peeled off, the other side will peel off in the same way, but on the other side, the width of the adhesive tape is wide and more strongly glued, so let's take the time to peel it off carefully.
Even if it breaks by any chance, it is possible to peel off by using a tool such as tweezers, so let's work carefully without rushing.
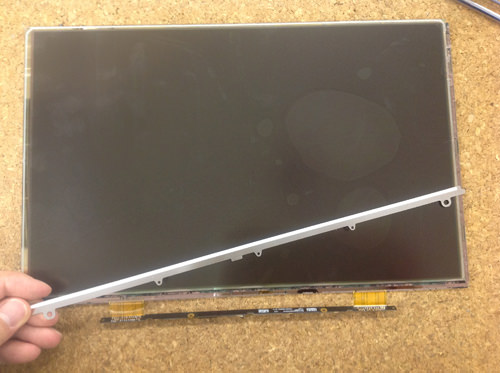
[MacbookAir A1369 LCD panel replacement and repair method STEP 25]
The LCD panel on the MacbookAir has been removed.
The deflection film inside the LCD panel is very delicate, and be careful that if you scratch it, the scratches will stand out when you incorporate the liquid crystal later.
[MacbookAir A1369 LCD panel replacement and repair method STEP 26]
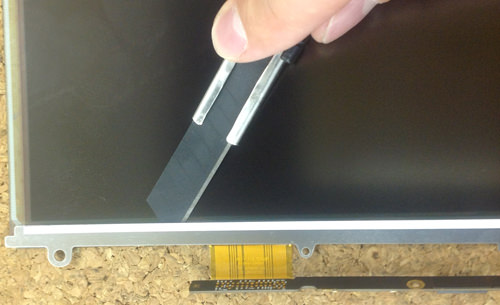
The iron plate is attached to the base side of the lcd panel with strong adhesive tape, so the cutter is used to peel it off, but the removed plate is fixed with double-sided tape to the new panel.
[MacbookAir A1369 LCD panel replacement and repair method STEP 27]
Iron plates can be easily peeled off using a cutter, and the process of disassembling panels only is complete.
In the disassembly process so far, only the panel was removed from the personal computer.
After that, if you replace it with a newly prepared LCD panel, the LCD replacement of the MacbookAir will be completed.
It is a little difficult to attach LED connectors and LCD cables to the base under the LCD when incorporating into the new LCD panel.
Please be careful because it is possible that a new liquid crystal panel will be damaged if the repair is not advanced while understanding the structure.
[MacbookAir A1369 LCD panel replacement and repair method STEP 28]

I was able to confirm that it is displayed normally though the panel was installed in the MacbookAir and the power was turned on.
Once you get used to the work, you will be able to change the LCD in about an hour, but if you are disassembling the MacbookAir for the first time, I think it is better to take about 3 hours to repair it.
[An assicity]
MabookAir is also a very popular model, I think that there are many people who are used.
There was no model change from 2010 to 2017, but the new MacbookAir will finally be released on November 7, 2018.
When it comes to the model of eight years ago on a Windows PC, there is an old impression, but in the case of Mac, I do not feel old even in the 2010 model even now because I do not feel old in the design.
In fact, there is still a request to replace the liquid crystal of the 2010 model, so please feel free to consult us in case of failure.
The LCD replacement of MacbookAir is possible at half the price of the manufacturer repair.


コメントを残す