The touch panel of the iPad 4 is not secured with screws and is attached only with double-sided tape.
You may think that double-sided tape will easily peel off, but you will need tools such as heat guns and dryers for more powerful tape than you think.
The cost of asking Apple to repair the iPad 4 Retina LCD was 32400 yen (excluding tax).
I think that it will be a model considerably before from the history of the iPad because it becomes 2012 that iPad 4 Retina was released in 2012, but I think that the second hand of the normal moving work will be able to be purchased when it exceeds 30,000 yen.
In addition, since data erasure is basic when you send it to manufacturer repair, you can not back up the data, if you do not know how to do it, it will be a choice of whether to ask a private repair shop or repair yourself.
I introduce the tool which becomes important in the decomposition below, but please prepare if there is something which can be substituted at home, too.
This is a replacement repair method if the lcd glass of the iPad 4 retina breaks or cracks.
The sample iPad 4 does not crack the liquid crystal, but depending on the cracking condition of the touch panel glass on the surface, the time and effort to disassemble varies greatly.
Double-sided tape is attached to the red line part, but it is an image that heat is applied there with heat gun, dryer, etc., and the touch panel is peeled off while the tape is softened.
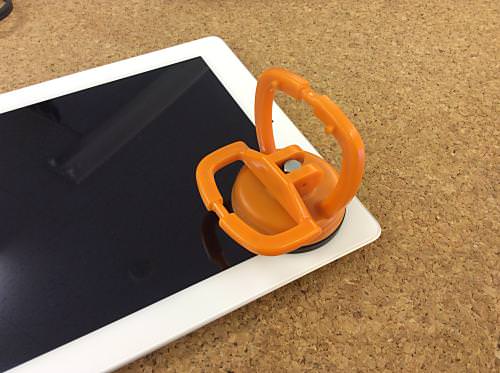
[iPad 4 Retina Glass Replacement STEP 2]
We will use suction cups and other items to disassemble the liquid crystal glass (touch panel).
Suction cups are sold at home centers and are mainly used by glass shops.
There are from large to small, but a small thing is enough for disassembling the iPad 4.
When the touch panel glass on the surface is broken, it does not stick firmly, so the work becomes difficult and patience is necessary.
Because the suction cup cannot be used if it is broken, the only way is to break the part where the heat is applied with an iron spatula, and to peel it off forcefully.
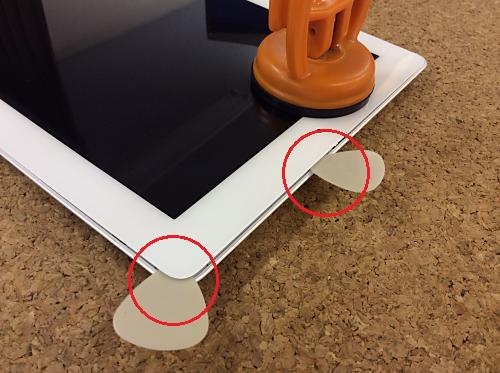
[iPad 4 Retina Glass Replacement STEP 3]
As can be said for all iPads, the decomposition of this liquid crystal glass is the most important for disassembling, so we will work carefully.
Do you see that the glass is farther than the main body?
It is the momentum that I want to remove at once as it is, but I will decompose carefully using a dryer, heat gun, etc.
I float it little by little, and insert the pick etc. in the gap, and the glass does not stick again.
Please be careful not to insert the pick etc. deeply into the main body.
Cables and parts may be damaged.
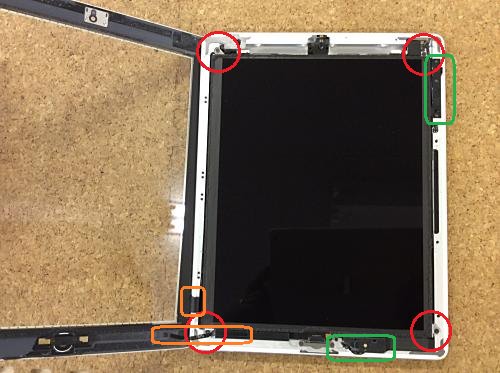
[iPad 4 Retina Glass Replacement STEP 4]
This is an image of the touch panel glass of the surface peeled off.
Please note that the liquid crystal glass is still attached to the main body, and the cables are also connected to the main body, so if you remove it forcibly, it will break.
Because the home cable of the film type is connected to the main body in the orange part (on the left side when the home button is down), it is necessary to be careful not to cut it.
The green part is also cable-related, so be careful not to break it when you peel off the touch panel glass.
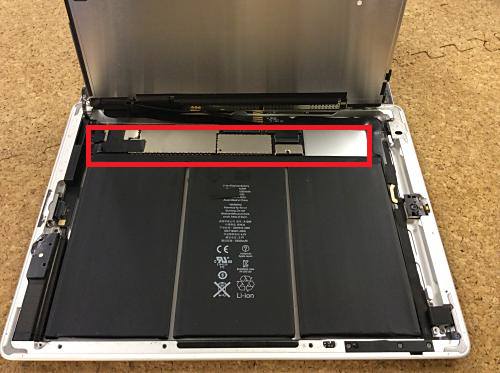
The part of the red circle is four screws that stop the liquid crystal glass, but it is good to put it in a part case that can be divided so as not to lose it because it is very small.
[iPad 4 Retina Glass Replacement STEP 5]
It is a state in which the liquid crystal panel was raised.
The cable extends from the left side to the main body, and it is connected to the main base (logic board) of the iPad4 which is surrounded in red.
The black one below is the battery.
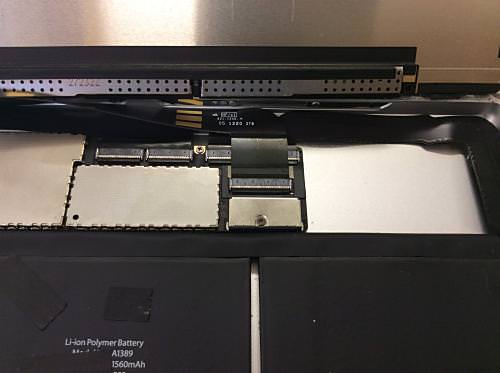
[iPad 4 Retina Glass Replacement STEP 6]
It is the part connected to the main base and each cable and battery.
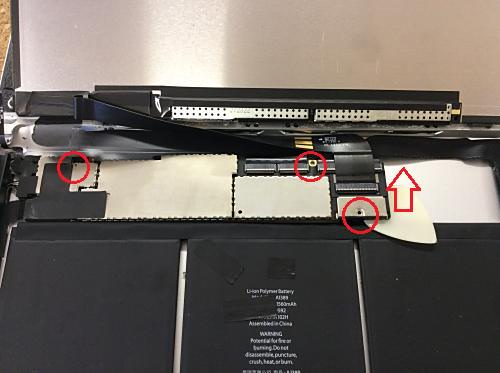
[iPad 4 Retina Glass Replacement STEP 7]
Remove the three red screws, float the main base slightly, release the battery and the base, and prevent picks from being energized between them.
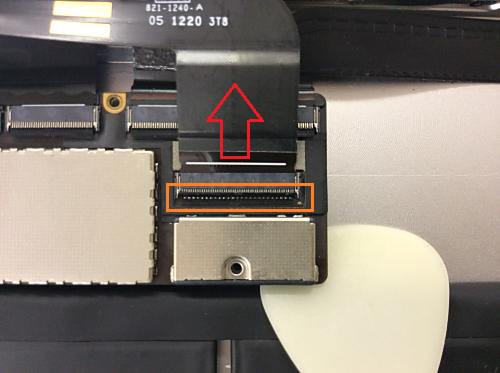
[iPad 4 Retina Glass Replacement STEP 8]
The connector part of the cable is locked with a nail so that it does not come off easily.
You can pull out the black nail of the orange part by lifting it to 90 degrees and then sliding the cable.
Since the LCD panel gets in the way when removing the touch panel, it is better to remove the LCD panel like this.
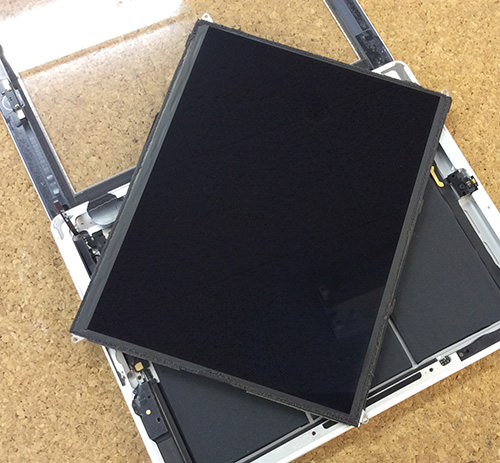
[iPad 4 Retina Glass Replacement STEP 9]
If you can remove the LCD panel, keep it so that it doesn't break.
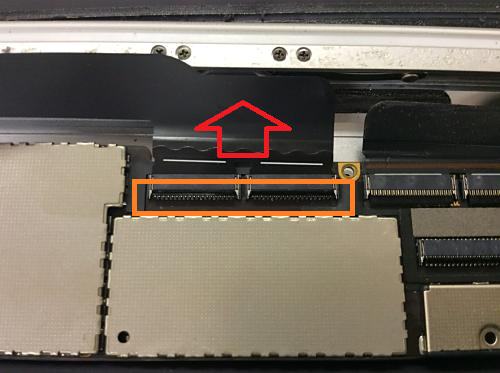
[iPad 4 Retina Glass Replacement STEP 10]
The touch panel is connected to the main base (logic board) with two wires.
It is possible to remove the wiring by raising two claws of the main base surrounded by orange and sliding the cable.
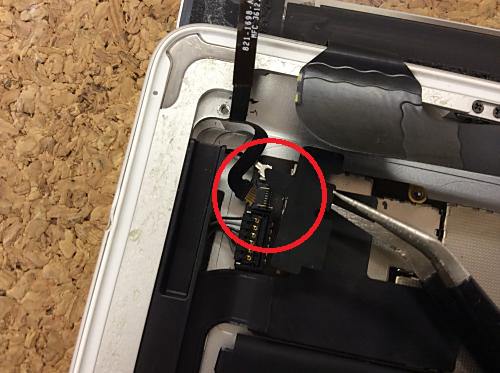
[iPad 4 Retina Glass Replacement STEP 11]
This part is a cable extending from the home button, but it is a wiring that was not in the iPad 2 and 3 of the previous model.
I think that I moved the cable after lifting the claw of the connector when I removed the liquid crystal,
You can remove it in the same way.
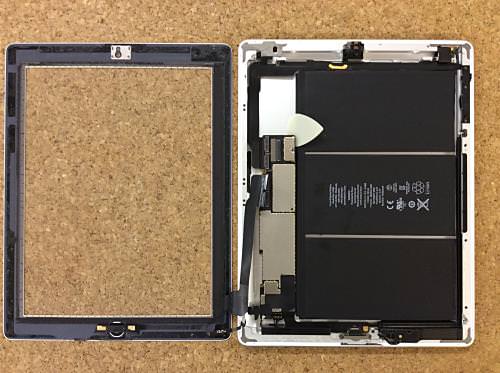
[iPad 4 Retina Glass Replacement STEP 12]
Now I was able to remove the touch panel from the main body.
If you are the first person to disassemble the iPad, it is better to think that it takes about two hours of work time.
After that, if you incorporate the touch panel prepared for replacement in the original procedure, it will be completed as a repair.
There is one point, but when you insert the touch panel, not only double-sided tape, but also the touch panel becomes difficult to peel off if you apply a slight bond on the tape.
It is good only on tape as it is, but if the iPad has heat, the touch panel may peel off, so I recommend bonding.


コメントを残す