How to repair when MacbookAir does not start, does not turn on, or is submerged, and disassembled
The following decomposition method will be helpful if the MacbookAir A1369 (13 inch) does not start or does not turn on!
[MacbookAir A1369 Logic Board Replacement STEP 1]
If the MacbookAir suddenly drops off, doesn't boot, or doesn't turn on, the logic board may be faulty.
In this decomposition method, all the process of removing the logic board is posted, but if you feel that it is difficult for you because the decomposition to the logic board is complicated, we recommend that you consult the repair shop without hesitation.
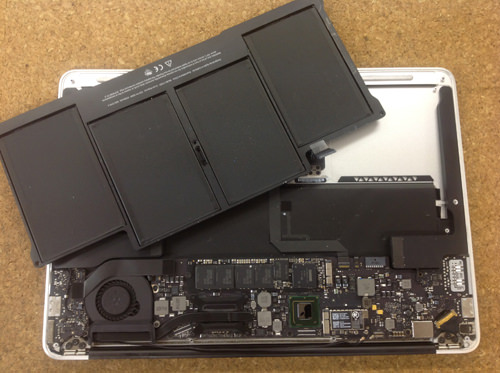
[MacbookAir A1369 Logic Board Replacement STEP 2]
The process of removing the internal battery from the main unit has been omitted, but please check the process so far by replacing the battery.
[MacbookAir A1369 Logic Board Replacement STEP 3]
From here, it enters the removal of the logic board, but please be careful not to lose the screw because there are a lot of fine screws.
In addition, the driver to be used basically will be a Torx driver (star type), so if you do not have it, please purchase it at a home center etc.!
It is possible to purchase it for about a few hundred yen.
First of all, it is removed from the liquid crystal cable, but this part is connected so that it does not shift by "the hook of the shape of the co" in addition.
I put the hook up first, and then slide the cable to make it come off easily.
[MacbookAir A1369 Logic Board Replacement STEP 4]
Next, remove the speaker connector, but the MacbookAirA1369 has two speakers.
One is connected to the power supply part, so the part to remove the connector is all right only in this image part.
It is possible to remove the connector easily if it is made to lift from the bottom to the top.
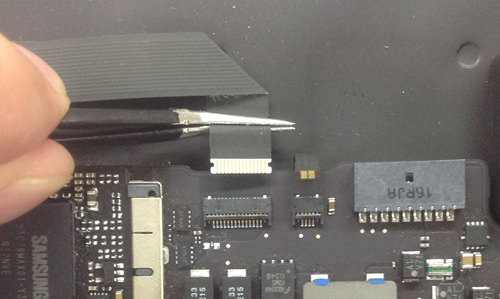
[MacbookAir A1369 Logic Board Replacement STEP 5]
Next, the backlight sheet of the keyboard is connected to the logic board, so I will remove it.
You can easily remove the knob of the small connector of the image part by lifting it up with tweezers etc. and then pulling out the cable.
By the way, I think that the keyboard shines when MacbookAir is used in a dark place with the backlight sheet, but the keyboard seems to be glowing by the thing that the sheet emits light.
[MacbookAir A1369 Logic Board Replacement STEP 6]
Next is the connector part next to the backlight sheet, but this is the cable that connects the logic board to the trackpad.
You can remove it by the same procedure as the backlight sheet above.
[MacbookAir A1369 Logic Board Replacement STEP 7]
This part becomes the Wifi terminal of MacbookAir.
The part pinched by the tweezerbecomes the Wifi cable, but this is connected from the logic board to the liquid crystal side.
Let's remove both because you can pull out the pin by lifting from the bottom to the top!
Because there is no need to remove the Wifi terminal body in particular, it is OK as it is this time.
If Wifi is no longer connected, replace this part.
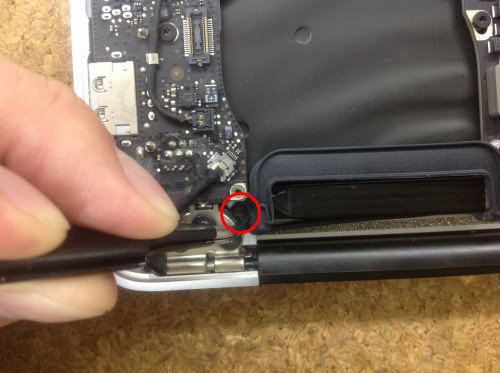
[MacbookAir A1369 Logic Board Replacement STEP 8]
The next thing to do is disconnect the cable that connects the power supply part to the logic board.
Most models other than MacbookAir have a set of power and logic boards, but this model is separate.
So if the power supply does not enter at all, it is not a replacement for each logic board, but there is also a thing to improve if you replace only the power supply part.
Remove the two red circle parts, but you can easily remove it if you try to lift it from the bottom to the top.
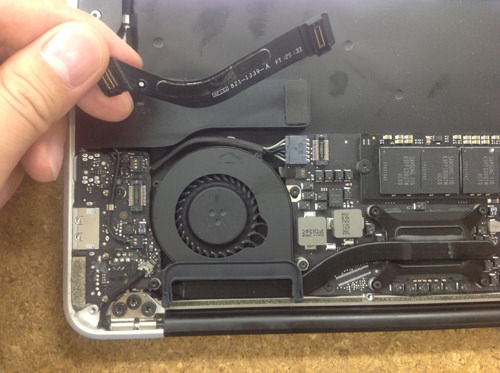
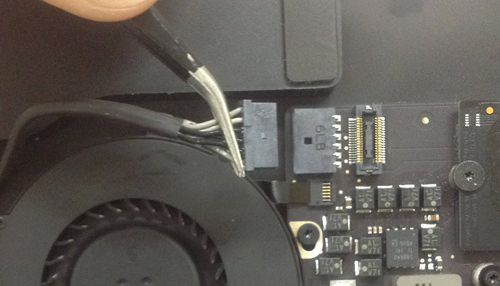
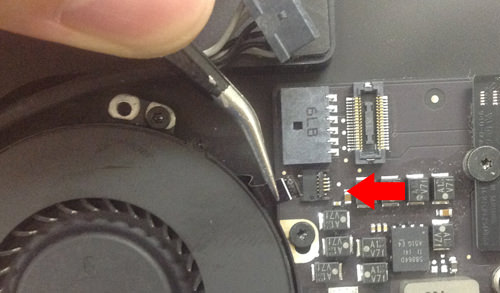
[MacbookAir A1369 Logic Board Replacement STEP 9]
I was able to remove the cable that connects the power supply and the logic board!
There is a small cable right next to the previous, but you can remove it by lifting the pin on the connector side and pulling out the cable.
By the way, this part becomes the cable of FAN.
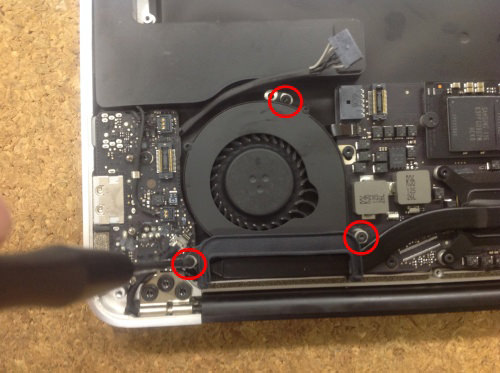
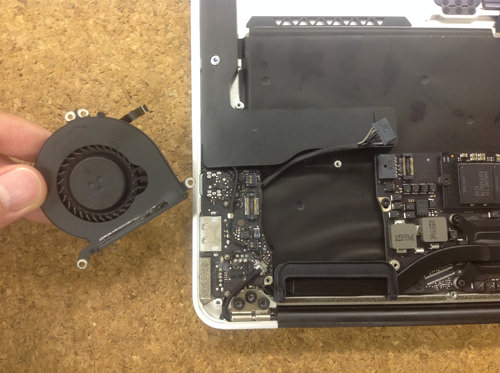
It was possible to remove only FAN from the MacbookAir body.
There are many things that there are two FNSs in MacbookPro, etc., but in the case of MacbookAir, FAN has become one.
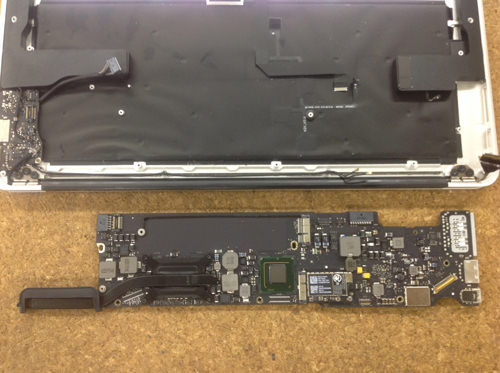
Only the logic board was able to be removed from the MacbookAir body.
Logic board is not an exaggeration to say that it is the most important part of MacbookAir, so please be careful about handling it!

 The following decomposition method will be helpful if the MacbookAir A1369 (13 inch) does not start or does not turn on!

 The process of removing the internal battery from the main unit has been omitted, but please check the process so far by replacing the battery.
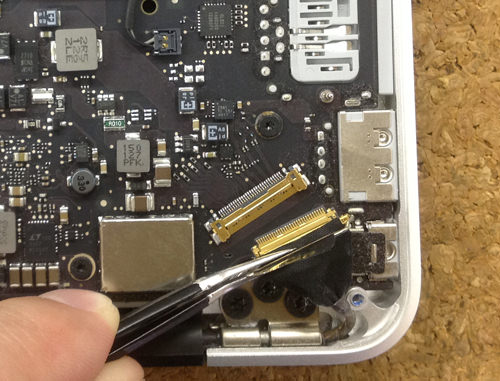
 From here, it enters the removal of the logic board, but please be careful not to lose the screw because there are a lot of fine screws.
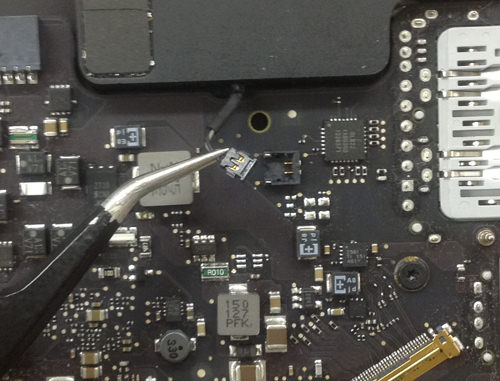
 Next, remove the speaker connector, but the MacbookAirA1369 has two speakers.
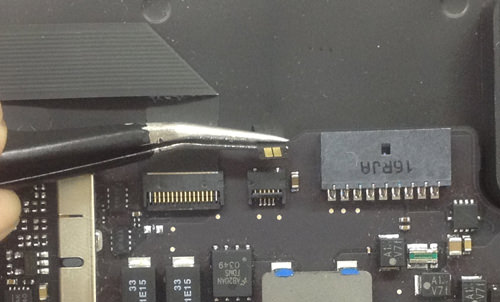
 Next is the connector part next to the backlight sheet, but this is the cable that connects the logic board to the trackpad.
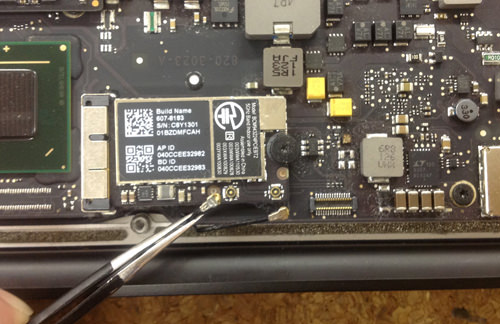
 This part becomes the Wifi terminal of MacbookAir.
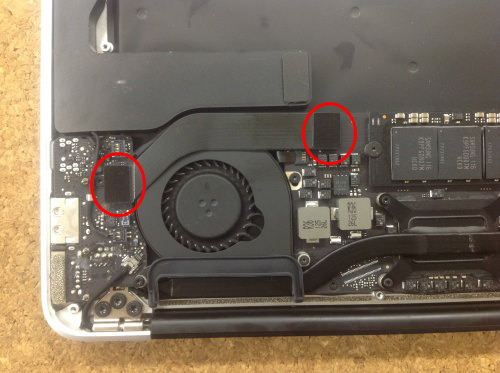


コメントを残す