How to repair iPad 3 LCD cracks and touch panel replacement
The iPad 3, which was launched as the third generation of the iPad, was released in 2012, so it is now an iPad that was released seven years ago.
I think that there are those who have been repaired by the expansion and screen cracking of the battery if you are using it without a problem once, but now it is a model that can be fixed cheaply if you can repair it yourself because the parts themselves are considerably cheaper.
There are advantages and disadvantages when fixing by yourself, but if you have confidence in your arm, please refer to it because we will publish the decomposition method below.
By the way, the repair fee when you repair the screen with Apple is 32400 yen (tax excluded).
In the case of the iPad 3, I want to keep the repair fee cheap even a little because I can purchase a good thing of the degree in the secondhand if I put out 30000 yen.
iPad 3 LCD glass replacement and decomposition procedure
- [STEP 1]
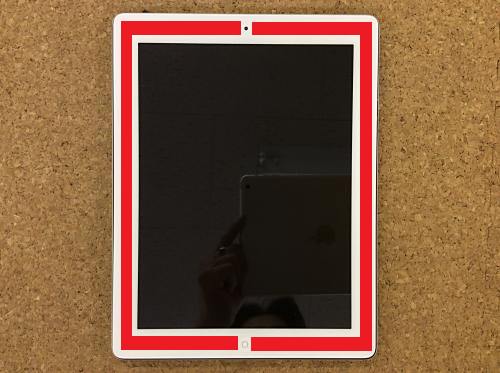
- It is a replacement repair method when the LCD panel of the iPad3 cracks or cracks.
The sample iPad does not crack the liquid crystal, but the time and effort to decompose varies greatly depending on the cracking condition of the touch panel glass on the surface.
Even if the touch panel is cracked or not, the basic decomposition method is the same, so please refer to the repair method. - First of all, a strong double-sided tape is attached to the part filled with red, so i warm it with a heat gun or a dryer and float the double-sided tape.
If it is too hot, burns and parts may be deformed or damaged by heat.
Also, let's shut down the iPad before you start.
- [STEP 2]
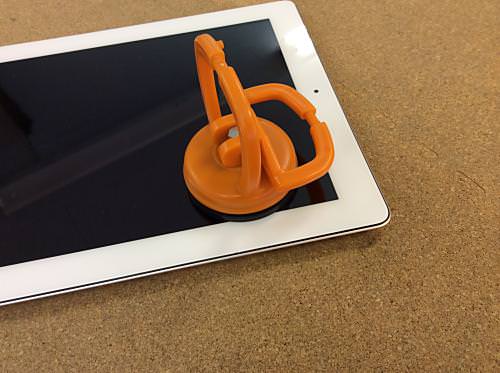
- Next, we start to disassemble the liquid crystal panel using suction cups and other methods.
Suction cups are sold at home centers and are mainly used by glass shops.
There are from large to small, but small things are enough for disassembling the iPad.
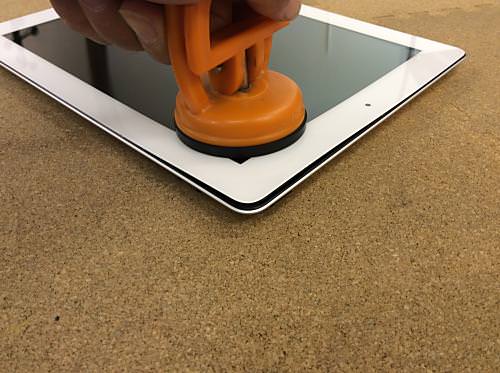
When the touch panel glass on the surface is broken, it does not stick firmly, so the work becomes difficult and patience is necessary.
Also, be careful not to get hurt by broken glass.
If the glass (touch panel) is broken and the suction cup cannot be used, after applying heat, insert a thin tool at the tip into the gap between the glass and the body and float the touch panel slightly.
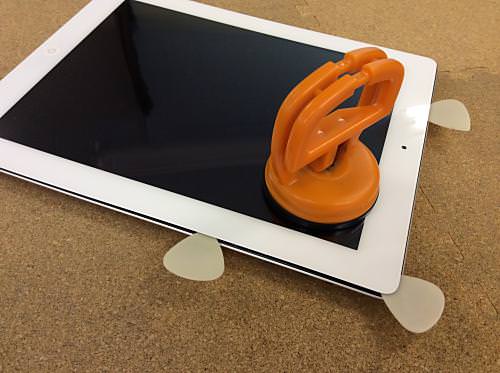
- [STEP 3]
- Decomposition of this LCD panel is the most important for disassembling the iPad, so we will work carefully.
Can you see that the touch panel on the surface is slightly further away from the main body?
It is the momentum that I want to remove at once as it is, but I will peel it off carefully little by little using a dryer, heat gun, etc.
Make a gap little by little, insert a pick, etc. into the gap, so that the glass does not stick again.
Please be careful not to insert the pick etc. deeply into the main body.Cables and parts may be damaged.
There is a plastic frame between the touch panel and the main body on the surface, but be careful not to deform or cut it.
Please be assured that there will be no problem with the performance of the iPad even if the frame is removed by any chance.
- [STEP 4]
- It's a good idea to peel off the touch panel on the surface and put a thin one in the floating area, such as a thin guitar pick.
If you plug it too deeply, you will cut the parts and wiring in it, so insert about 5mm as a guide.
In this way, if you do not release little by little, the touch panel will suddenly break.
If it is cracked from the original, it may be peeled off a little forcefully, but be careful because the connector on the touch panel is still connected to the logic board.
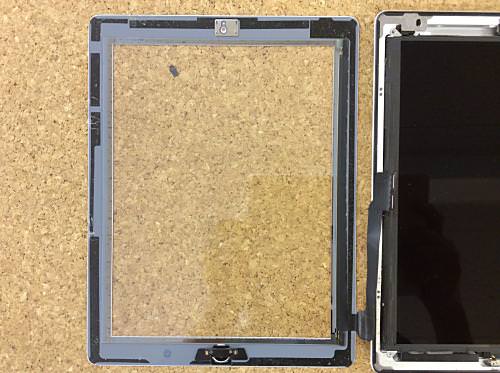
- [STEP 5]
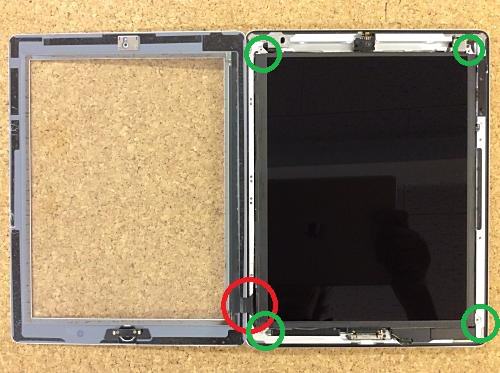
- This is the image that opened the touch panel.
The touch panel extends from the lower left side and the red area to the main unit, and is connected to the main base of the iPad (logic board).
So the way to open the touch panel is from right to left in terms of images.
That's it!Instead, the decomposition continues because the wiring of the touch panel is covered with snow on the logic board.
There is an LCD panel under the touch panel and a cable on the touch panel below it.
So it is necessary to remove the liquid crystal panel, but there are four screws in the green mal part, so you can remove the liquid crystal display with this.
Please do not remove it strongly because there is wiring even if the screw of the liquid crystal panel is removed.
- [STEP 6]
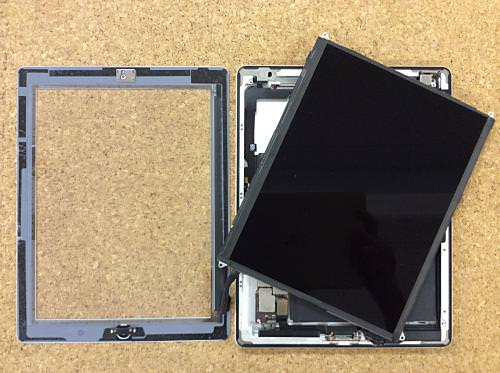
- After removing the four screws (green circles) in STEP 5, you can move the LCD panel as shown in the image by putting a tool such as a spatula under the liquid crystal panel and twisting the liquid crystal panel a little at a time.
Please do not pull it forcibly because it does not come off completely yet.
- [STEP 7]

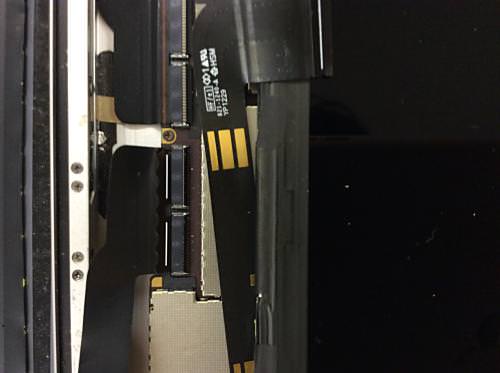
- Remove the part where the battery and the main base (logic board) are connected, but float with a plastic insulating object such as a pick, remove the screw of the part of the green mal, float the main base slightly and release the battery and the base, Picks, etc. between them so that they do not enter the current.
When performing this work, the LCD panel gets in the way, but it comes to work in the gap while suppressing the liquid crystal, and the cable extending from the liquid crystal panel is inserted into the left side of the red circle, but it is removed.
The cable is plugged into the logic board side, but it is possible to pull out the wiring by sliding it after the nail is raised.
Check with STEP 8.
- [STEP 8]
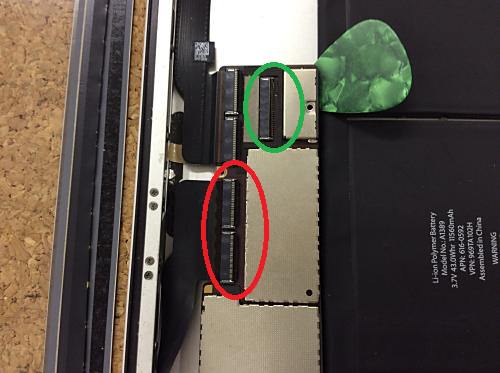
- The connector part of the cable on the LCD panel and touch panel is locked with a nail to prevent it from slippage easily.
Green is the cable of the liquid crystal display, and red is the nail which secures the cable of the touch panel.
Lift the black claws on top of each part, raise them to 90 degrees, and then slide the cable to the left to pull it out.
- [STEP 9]
- The cable may enter the gap between the case and the main base, so if you remove it carefully, the liquid crystal display and the touch panel will come off.
- [STEP 10]
- Now I can remove the LCD glass of the iPad3.
After that, the glass replacement is completed if the home button is transplanted to the liquid crystal prepared and reassembled with the original procedure.
If you are disassembling for the first time, it is better to consider the time it takes to replace the glass of the iPad 3 from 1 to 2 hours.
Decomposition method is exactly the same even if the glass is shattered.


コメントを残す