Repair methods such as MacbookPro A1286 does not start, does not advance from the apple mark, etc.
If you are using MacbookPro, i think that you have experience, but do not proceed to freeze from the apple mark at startup, shut down without permission, folder mark will come out, Have you ever been troubled by symptoms such as heavy operation, although you can start?
In many cases, the cause is a failure or failure of the HARD drive (hard disk), and the problem of the OS.
Since the hard disk is a place to store the data, it becomes very difficult to retrieve the data if the above symptoms occur in a state where the above symptoms are not taken up by any chance.
If you don't have particularly important data on your hard disk, you won't be too impatient, but if you're using it at work, it can be a serious problem.
The Mac used for this disassembly is the Macbook Pro 15 inch A1286, but there are very many people who own it,
Even 13 inches and 17 inches released at the same time are basically the same method of disassembly.
In addition, if you want to replace the current hard disk with an SSD rather than a hard disk failure, it will be the same way, so I think that you can refer to it.
How to replace and repair a hard disk on the MacbookPro A1286
[MacbookPro A1286 Hard Disk Replacement STEP 1]
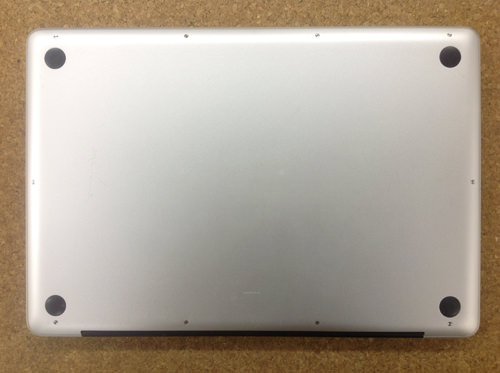
The hard disk will be the work to remove the back cover.
First of all, let's remove all because it is stuck in 10 places with a plus screw when the main body is turned over.
MacBook Pro, as can be said to Apple products in general, the shape and length of the screw is slightly different depending on the location, so please do not forget the location of the screw that you removed until it can be disassembled.
[MacbookPro A1286 Hard Disk Replacement STEP 2]
If you remove all screws, you can easily remove them by lifting the bottom case (back cover).
Dust may accumulate inside at this time, but please do not clean immediately.
Because there is a case that causes a short if you clean while it is energized, let's put up with it and go to the next step!
[MacbookPro A1286 Hard Disk Replacement STEP 3]
When the back cover is removed, it is possible to confirm that there are various parts such as battery, logic board, hard disk, but please give priority to removing the battery in order to disassemble.
Since the battery is only three places with a special screw, all removes, but the tool used is a special screwdriver called "Y-shaped screwdriver".
There is not much to see in the home center, etc., but it is possible to easily purchase it in amazon etc.
[MacbookPro A1286 Hard Disk Replacement STEP 4]
If you do not use a dedicated screwdriver, the screw thread will collapse, so be sure to remove it using a Y-shaped screwdriver.
[MacbookPro A1286 Hard Disk Replacement STEP 5]
Remove all battery screws and the battery and connector are connected to the logic board on the main computer board.
It can be easily removed by hand, but if it is hard, use a plastic spatula to block the removal and energization so as not to damage it.
If you have put up with dust a while ago, simple cleaning is possible.
If you can not clean without removing fan, let's do it after understanding the decomposition method without overdoing it.
[MacbookPro A1286 Hard Disk Replacement STEP 6]
The hard disk is removed from here, but the hard disk is fixed so that it does not move with black plastic parts.
Use a Phillips screwdriver to remove black plastic parts as shown in the image.
[MacbookPro A1286 Hard Disk Replacement STEP 7]
I was able to remove the parts that are holding down the hard disk.
This part will be reused even if you replace the hard disk, so please keep it so that it does not disappear.
[MacbookPro A1286 Hard Disk Replacement STEP 8]
You can lift the hard disk when you can remove the parts of the previous.
However, the hard disk is still connected to the cable, so do not pull it forcibly.
[MacbookPro A1286 Hard Disk Replacement STEP 9]
The hard disk and cable are disconnected.
The tip of the cable is a connector, but please grasp it firmly with your finger before sliding it in parallel.
[MacbookPro A1286 Hard Disk Replacement STEP 10]
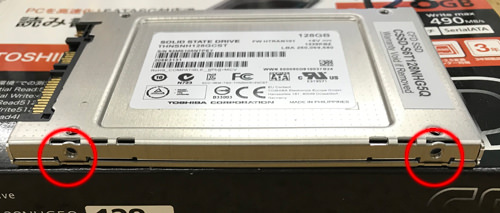
Only the hard disk was able to be removed from the main unit.
There are four screws on both sides of the hard disk, but remove them all.
If you install this screw in the same hole position on the hard disk to be replaced, and incorporate it in the original procedure, the hard disk replacement is complete.
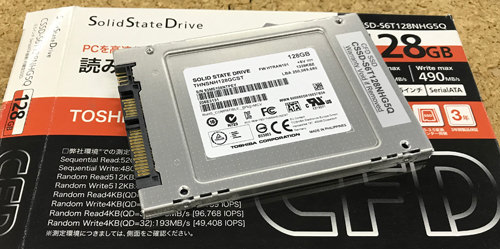
[SSD replacement STEP 1 of MacbookPro A1286]
If you are using a Macbook Pro and want to replace your hard disk with an SSD, we will prepare an SSD like this.
In the past, I had the impression that SSDs were expensive, but I think that it became easier to replace SSDs because they were much cheaper than before.
If you are installing an SSD in this Macbook Pro, you can select 2.5 inches, SATA, and replace SSDs according to your budget, such as 256GB and 1TB.
If you are considering speeding up your Mac, adding more memory and replacing SSDs are essential.
In addition, there are several specifications for SSDs, but there is a standard called PCIE other than this SATA.
It's faster than a 2.5-inch SSD, but basically it can't be installed on this Macbook Pro, so be careful when buying it.
[SSD replacement STEP 2 of MacbookPro A1286]
Let's attach it to the red circle part which was attached to the original hard disk, and build it up to the original state.
[An assicity]
If you have trouble with Your Mac does not start even though you replaced the hard disk!
Is there a program (OS) installed to start your Mac on that hard disk?
If the operating system is installed but does not start, it is recommended that you reassemble it again.If the symptoms do not change even if the hard disk is reassembled, it is necessary to investigate because there is a case such as a failure of the hard disk prepared and the cable failure.
If you have not done any work after replacing the hard disk, the Mac will not start, so you need to install the OPERAT, so please try the following steps.
Internet Recovery Mac and press command + R while pressing the power button.
For Macs that do not have Internet recovery, install the operating system from disk.


コメントを残す