How to repair and disassemble if the iPad 2 battery does not have and is inflated
I think that there are many people who are worried about the deterioration of the battery when thinking about the iPad 2 year, but it is possible to replace the battery (battery) cheaply by performing the following process.
The battery is built-in and cannot be easily replaced, but if you have confidence in your arm, please try it!
If you replace the battery of the iPad 2 with Apple, the repair fee is 10800 yen (tax not included).
Unlike LCD replacement, I think it is relatively reasonable, so if you are afraid to repair it yourself, we recommend that you consult the Apple Store and repair shop.
Will the data disappear if I change the battery?
The data will not disappear just by replacing the battery.
Since the data of the iPhone is recorded in the part called NAND on the logic board, the data is not lost just by replacing the battery.
However, the data is not lost only if you repair it yourself or repair it at a non-regular store.
If you want to replace the battery with data, you should avoid manufacturer repairs because it will almost 100% of the data initialization when you ask Apple or an authorized service provider.
In addition, if you can take a backup in iTunes, etc., there is no problem with the manufacturer repair, but you can not take the backup, if you feel troublesome please consult a non-regular store.
The advantage of non-regular stores is that most of the repairs that are not related to the data will proceed with the data as it is.
If you can replace the battery by yourself with reference to the decomposition method below, you can use the iPhone as it is with the data up to now.
However, it is safe to back up and remember how to back up in case of a failure that you do not know when it will happen.


- [battery replacement step 1 of iPad2]

- This decomposition method is also useful for expanding, degrading, and removing the motherboard if the iPad cannot be charged or the battery is bad.
The procedure for replacing the lcd glass of the iPad 2, replacing the LCD panel and disassembling it is the same, but you can check it in the image, so please disassemble it according to the procedure.- In addition, if you are disassembling the iPad for the first time, I think that it will take about two hours, so let's proceed carefully.
If you break the liquid crystal by any chance during the repair, it may become a rather expensive repair fee.
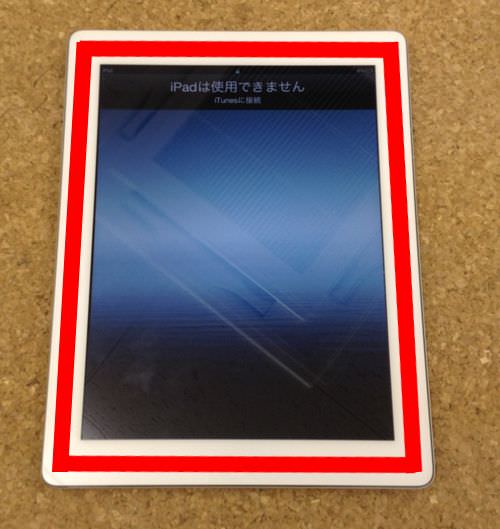
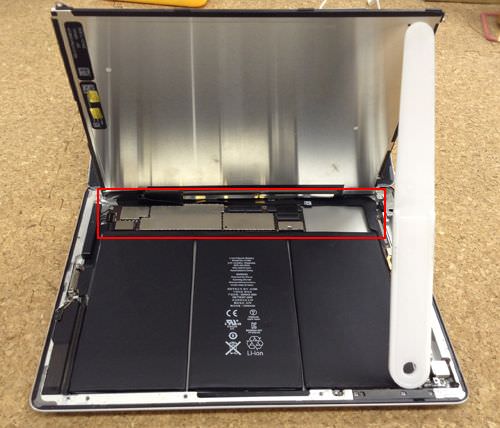
Since the battery of the iPad 2 is built-in, it is necessary to peel off the liquid crystal first.
Because a strong double-sided tape is attached to the red part, it warms it with a dryer, a heat gun, etc. and floats the double-sided tape, but the battery of the iPad 2 cannot be replaced without preparing a tool to some extent. - In addition, if you are disassembling the iPad for the first time, I think that it will take about two hours, so let's proceed carefully.
- [battery replacement step 2 of iPad2]

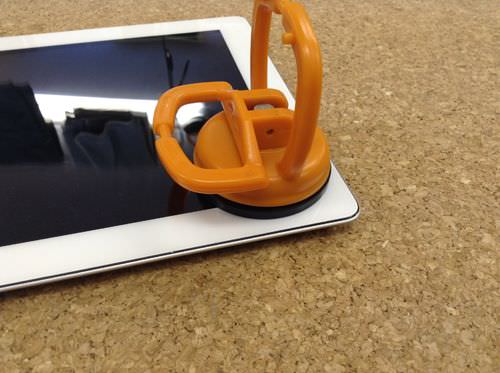
- Next, we start to work on disassembling liquid crystal glass using suction cups and other methods.
Suction cups are sold at home centers and are mainly used by glass shops.
There are things from large to small, but small ones are enough to disassemble the iPad. - I think that the explanation of how to use is not particularly necessary, but the position is done while the knob is knocked down, and the knob is raised when the position is decided.
If it can be installed correctly, you can lift the iPad with only a suction cup, but if you lift it without heat, the touch panel will crack. Be sure to heat it with a heat gun and then lift it slowly.
- [battery replacement step 3 of iPad2]
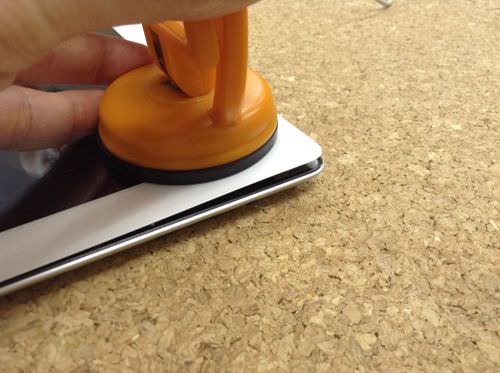
- Decomposition of this liquid crystal glass is the most important for disassembling the iPad 2, so let's work carefully.
Do you see that the glass is farther than the main body?
It is a place that I want to remove at once as it is, but I will decompose carefully using a dryer, heat gun, etc.
If the heat is not hit so much, the glass will not peel off at all, so if the glass does not float at all, apply heat again and repeat the same work. - It may seem like a very laborious task, but the most time-consuming iPad repair is to remove glass or liquid crystal.
If you don't take the time to do it slowly, you accidentally put a crack!I've broken the screen!It is necessary to be careful because it might become a thing.
- [battery replacement step 4 of iPad 2]
- The battery covered by this disassembly is in the deepest part of the iPad.
To reach the battery, you need to remove the LCD glass and LCD panel.
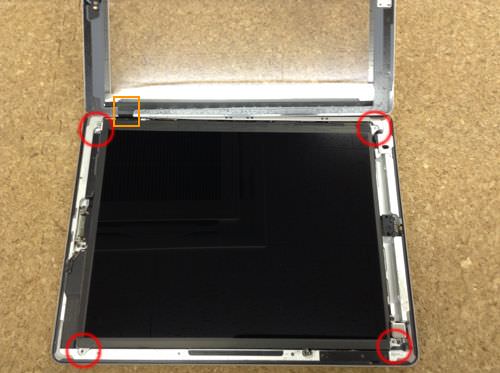
The liquid crystal glass has come off the main body, but the cable (orange part) connecting the liquid crystal glass to the iPad body is still attached.
If you remove the liquid crystal glass forcibly in the process of removing it, the cable part will be cut off, so when removing the cable surface, it will work carefully.
When removing the battery, it is safe to remove the liquid crystal glass completely, so let the liquid crystal glass lie while paying attention to the cable of the orange part.
In addition, wifi part and the cable of the volume switch may be involved in the work of removing the double-sided tape, so when you break down the liquid crystal glass, I think that it is a good way to check by looking into the inside and off a little.
The red circle part becomes the mounting screw of the liquid crystal panel, so remove all.
- [battery replacement step 5 of iPad 2]

- The liquid crystal glass is okay in a state of being laid, but all connectors and screws of the logic board part, which is enclosed in red, are removed.
If you are used to disassembling, you can replace the battery without removing the logic board, but this time we will proceed in the direction of removing the logic board in search of certainty.
- [battery replacement step 6 of iPad 2]
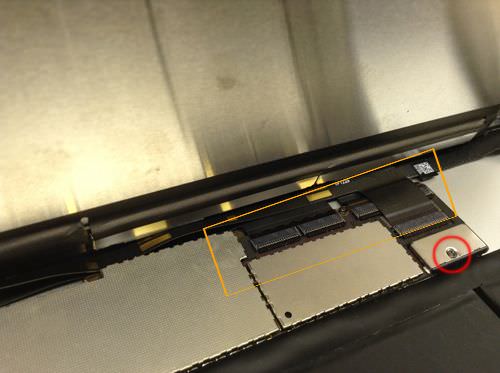
- Remove the battery connection (red) before removing the orange part.
There is a screw in the red circle part, but it is a mechanism that is connected to the battery by closing the screw, so it will come off when loosened.
When the screw of the battery connection is removed, the orange part becomes the part where the wiring such as the liquid crystal glass and the liquid crystal panel is connected, and all are removed.
- [battery replacement step 7 of iPad 2]
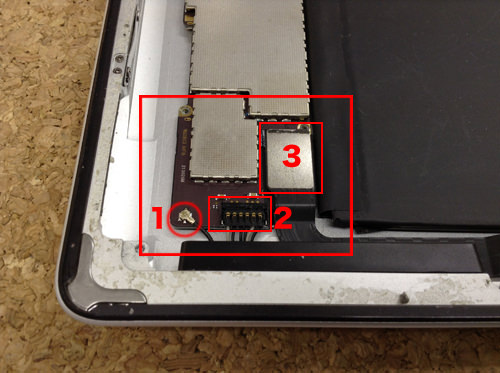
- After removing all STEP6, remove the opposite part of the image.
If you remove three places in total, the connector relationship connected to the logic board will be removed all.
- [battery replacement step 8 of iPad 2]
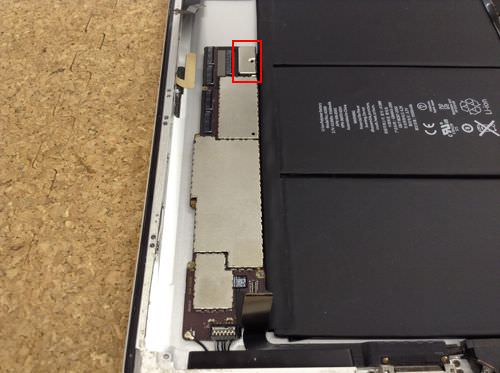
- All connections on the logic board have been removed.
After that, you can take it out by lifting the logic board up.
The part enclosed in red connects the logic board to the battery.
- [battery replacement step 9 of iPad 2]
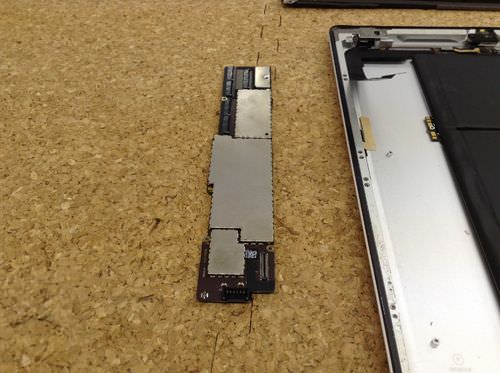
- The logic board is taken out of the iPad body, but it becomes a very delicate part, so please be careful when storing it.
- [battery replacement step 10 of the iPad 2]

- Put thin objects such as spatulas and rulers in the gap under the battery and remove them.
Since the battery is attached to the main body with a strong double-sided tape, it is easy to remove it when you work after warming it with a heat gun, a dryer, etc.
However, please do not apply wind directly to the battery when using a heat gun, dryer, etc.
It is ideal to hit lightly from the back of the body. - It may not be recognized even if you remove the battery and install a new battery, but it may also be due to the logic board and battery part not grounding well.
In that case, please try because it may improve if you apply a contact reviving agent to the tip of the battery a little. -
- [battery replacement step 11 of iPad 2]
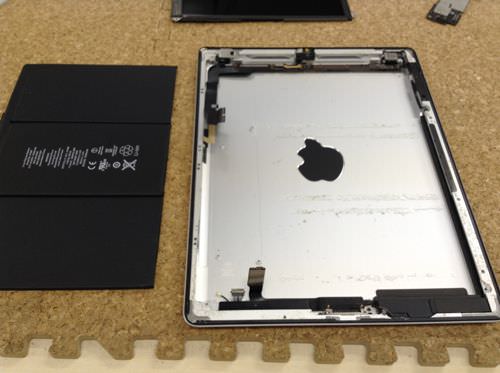
- The battery on the iPad 2 has run out.
Usually, battery replacement is a method when the battery becomes unwell.
It is only work to replace the battery, but the battery of the iPad can not be easily replaced like a personal computer because it is buried in the inside of the main body.
Almost, we will disassemble to the state of the whole barasi, so please see the decomposition method, please consult the repair shop if it seems impossible.
In addition, there is a risk that the battery will expand if left in the car or in a hot place for a long time, be careful because the battery that has expanded also needs to be replaced.