
ASUS TAICHI 31 LCD crack screen replacement Repair method, disassembly procedure
The ASUS TAICHI 31 is very different from a regular laptop, and the back side is also equipped with a liquid crystal.
Because it can be used as a tablet type if possible to use as a laptop, it will be covered by one even if you do not purchase a tablet separately.
Usually, the back side is covered so that it almost does not break, but in the case of TAICHI 31, it is necessary to be careful when storing it because it is a liquid crystal panel to the back side.
Even if you close the pc, it is safe to put it in a case that can be protected when you carry it because the liquid crystal is always exposed.
Since most of the contents to receive the inquiry of the breakdown are the panel crack on the back side, it is better to put it in some case.
Because it becomes assembly exchange in this decomposition method, I think that it is possible to correspond to both the liquid crystal cracking of the inside and the back side, so if you can refer to it when it fails.
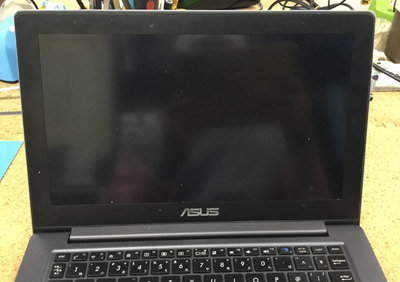
[ASUS TAICHI 31 LIQUID crystal repair and disassembly method STEP 1]

- This liquid crystal failure will be a crack in the LCD panel on the back side when closed.
Since it becomes assembly replacement (all upper body is replaced), it is also possible to cope with the inner liquid crystal cracking instead of the back side.

[ASUS TAICHI 31 LIQUID crystal repair and disassembly method STEP 2]
- This is the inner liquid crystal crack, but there is no crack or display defect, and it is displayed normally.

[ASUS TAICHI 31 LIQUID crystal repair and disassembly method STEP 3]
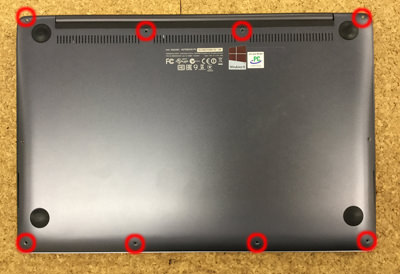
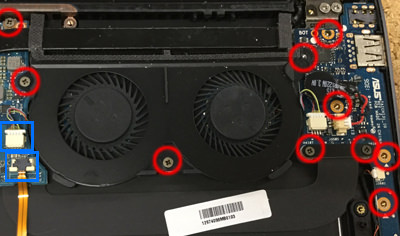
- It enters the decomposition from here, but the main body is turned inside out, and all screws in the red circle part are removed.
Use a dedicated screwdriver because it will be Torx instead of a plus screw.
Please be careful because it will not be able to open the screw will be licked if you try to remove the screw forcibly with a Phillips screwdriver!

[ASUS TAICHI 31 LIQUID crystal repair and disassembly method STEP 4]
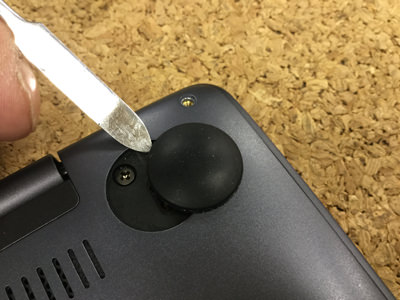
- You cannot remove the bottom cover just by removing the eight screws.
The screw is also hidden inside the rubber foot in the hinge part, so don't forget to remove it!
Rubber feet can be easily peeled off with a pointed tool.
[ASUS TAICHI 31 LIQUID crystal repair and disassembly method STEP 5]
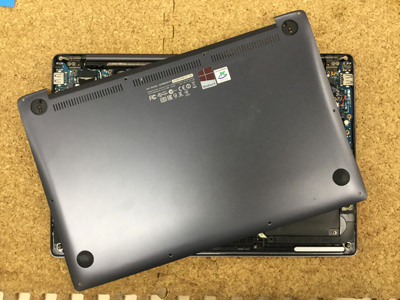
- I was able to remove the bottom cover.
[ASUS TAICHI 31 LIQUID crystal repair and disassembly method STEP 6]
- After removing the bottom cover, first remove the battery connector.
If you proceed with the decomposition without doing this, there is a risk of shorting, so be sure to do so.
[ASUS TAICHI 31 LIQUID crystal repair and disassembly method STEP 7]
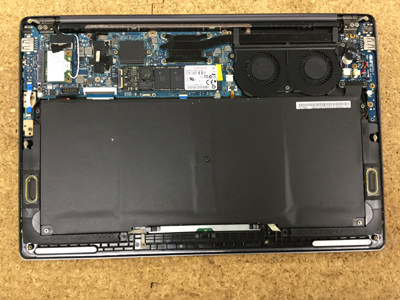
- Since it is not energized after removing the connector of the battery, I think that it is good to understand the internal structure.
After removing the battery, the tool is fine with "iron", but please use a plastic tool until you remove the battery connector.
The battery is screwed to the main unit, but let's remove the screwdriver.
[ASUS TAICHI 31 LIQUID crystal repair and disassembly method STEP 8]
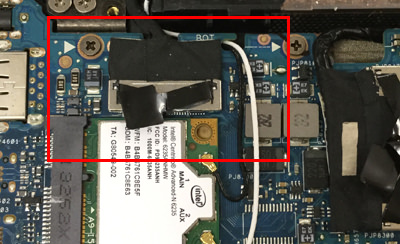
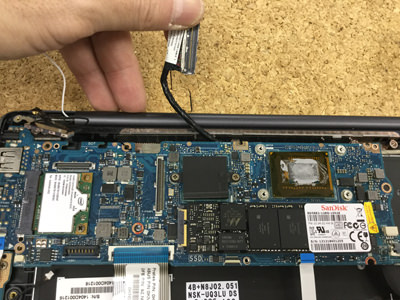
- This part is located on the Wifi terminal, but it is a cable extending from the liquid crystal.
Because it is connected to the motherboard side, it is possible to remove it easily if the tool is used and it wakes up from the bottom.

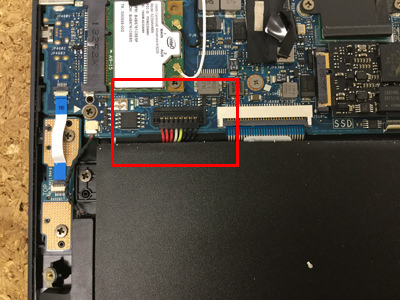
[ASUS TAICHI 31 LIQUID crystal repair and disassembly method STEP 9]
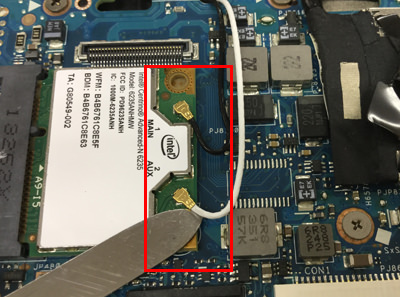
- Because there is a Wifi cable just below the liquid crystal cable of the previous, the tool is removed as shown in the image.
It is a way to remove, but you can easily remove it if you wake it up from the bottom.

[ASUS TAICHI 31 LIQUID crystal repair and disassembly method STEP 10]
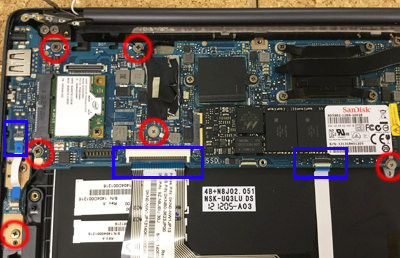
- This is around the power board and Fan, but there are several fine screws, so I remove them all.
The red circle part is a screw, and the blue frame part is a connector connection.
Slide the upper connector as it is, and slide the lower connector with the white claws on both sides before pulling out the orange connector.

[ASUS TAICHI 31 LIQUID crystal repair and disassembly method STEP 11]
- This is the opposite side of the power supply area.
Remove the red-circle screw, and slide the cable after causing the claws to be removed from the blue frame for connector connection.

[ASUS TAICHI 31 LIQUID crystal repair and disassembly method STEP 12]
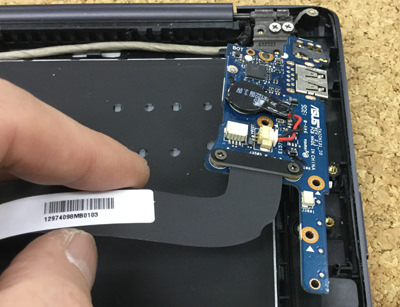
- Make sure you forget to remove the screw, and if there is no problem, remove the power board as shown in the image.

[ASUS TAICHI 31 LIQUID crystal repair and disassembly method STEP 13]
The LCD cable is wired from the power board side, but it can be easily used if you do not forget to remove the screw.
[ASUS TAICHI 31 LIQUID crystal repair and disassembly method STEP 14]
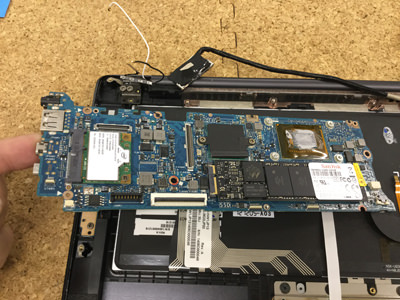
- The motherboard could be removed.
The motherboard becomes a precision part, but please be careful when storing it because it may not turn on if you scratch it.
[ASUS TAICHI 31 LIQUID crystal repair and disassembly method STEP 15]
- The motherboard, power board, and battery could be removed from the main unit.
[ASUS TAICHI 31 LIQUID crystal repair and disassembly method STEP 16]
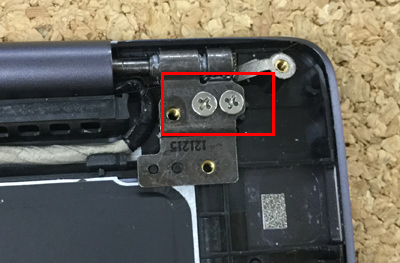
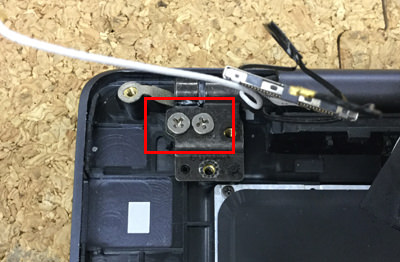
- The main body and liquid crystal are still attached, but the removal process is a little later.
The plaque frame part is called a hinge, but it is fixed with two screws each on the left and right.
Let's use out the Phillips screwdriver.

[ASUS TAICHI 31 LIQUID crystal repair and disassembly method STEP 17]
- It is the opposite side of the previous, but remove it by the same procedure.
If you can remove all the screws in the hinge part, you can separate the body and the liquid crystal side, but hold the body firmly with both hands and open it little by little.

[ASUS TAICHI 31 LIQUID crystal repair and disassembly method STEP 18]

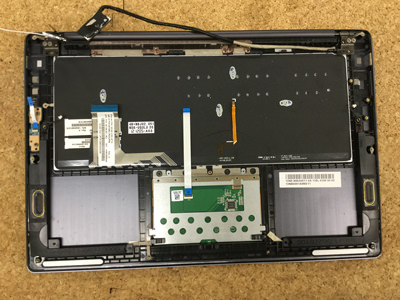
- It was possible to divide it into the liquid crystal side and the main body side.
In the case of liquid crystal replacement (assembly replacement), replace the newly prepared parts, and reassemble with the original procedure, and the work is finished.