Disassembly and repair methods for NEXUS 7 2013 LCD cracking, etc.

Will the data disappear if I change the LCD?
I think that there are a lot of people who are quite anxious when repairing, but please be assured that the data will not be lost just by changing the liquid crystal.
However, it is a different problem if there is such as having broken the base and some parts while doing the decomposition, but you can use Nexus 7 with exactly the same data as before if the liquid crystal exchange is completed without problems.
However, this content is only when you repair it yourself, manufacturer, if you request a regular store, I think that the erasure of the data will be basic, so be careful.
If you want to repair leaving the data, please avoid the manufacturer or the regular store and repair it yourself or consult a private repair shop.
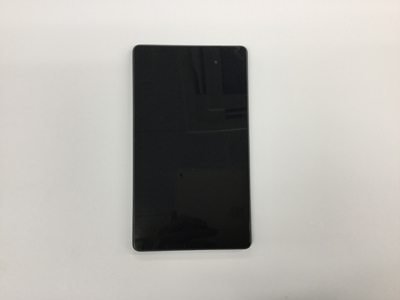
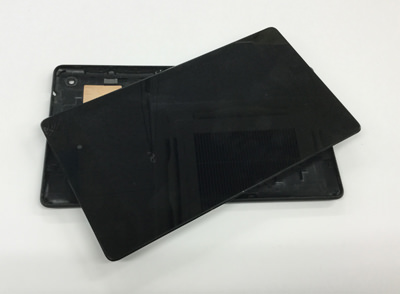
ASUS Google Tablet Nexus 7 We have disassembled the 2013 model!
- [Nexus 7 2013 LCD replacement and decomposition method STEP 1]

- In this disassembly, LCD panel, speaker, motherboard, etc. are removed, so we have carried out to the state of almost all barassi, so those who are thinking about replacing parts, please refer to it!
The LCD of the Nexus 7 2013 model is as integrated as the iPad Air2, but it has been disassembled to the stage before the glass replacement.
What I thought by disassembling is less difficult to disassemble than the iPad, and I feel that the tool can be substituted with something close to me to some extent.
I think that there is some trouble for those who disassemble the Nexus 7, but if you make a mistake in the procedure, you may end up with a serious injury rather than doing the decomposition with care.
- [Nexus 7 2013 LCD replacement and decomposition method STEP 2]

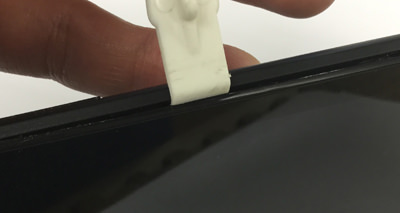
- First of all, it enters from the place where the rear panel is removed, but the tool is used as shown in the image.
This tool is used when disassembling the iPhone, but as a substitute, it is such as a caulking spatula sold at the home center.
I think that it is possible to decompose to some extent if it is a person with a long nail if it decomposes without spending money.
If there is a little gap between the lcd and the rear panel, you can break down by sandwiching the card and so on and repeating the work.
- [Nexus 7 2013 LCD replacement and decomposition method STEP 3]
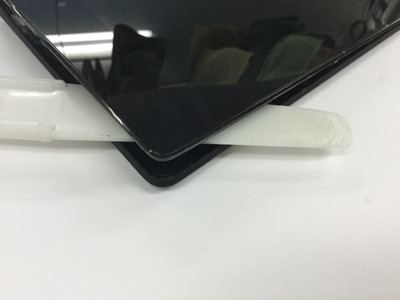
- The image is in a state where the tool is sandwiched between the gap ed.
I think this is essential because the iPad is fixed with a powerful double-sided tape, but the rear panel of the Nexus 7 2013 model is not tape, This work will not be necessary especially if it is possible to remove the cover to some extent because it is fixed only with plastic claws.
It becomes the dock connector part as a part to be careful, but it is not so difficult if you understand the structure.
If the plastic on the upper side and the left and right comes off, it is possible to remove it easily if the dock connector part is disassembled while pulling it to the camera side.
- [Nexus 7 2013 LCD replacement and decomposition method STEP 4]

- The back cover of the Nexus 7 could be removed.
Especially, wiring etc. can be easily removed because it is not on the cover side.
- [Nexus 7 2013 LCD replacement and decomposition method STEP 5]

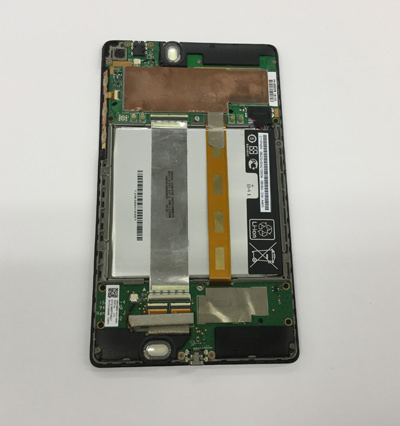
- The rear panel is removed in the previous process, but please disassemble it more carefully from here.
If you check what kind of structure the Nexus 7 is at this stage, the later process is not difficult.
- [Nexus 7 2013 LCD replacement and decomposition method STEP 6]

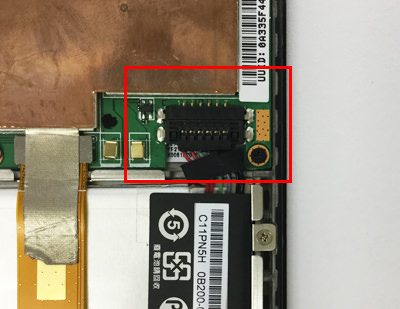
- After removing the rear panel, the first step is to remove the battery connector in the red frame.
If you remove the connector relationship before doing this, there is a possibility that you will be short-circuited at the worst, so be sure to remove it first.
- [Nexus 7 2013 LCD replacement and decomposition method STEP 7]

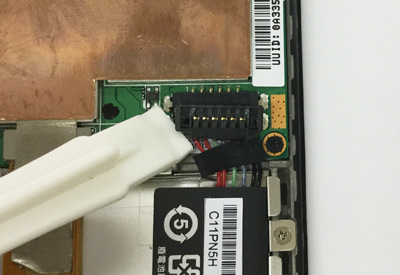
- The battery connector is connected so as to hold it down from top to bottom, so it is the opposite procedure when removing it.
It is possible to remove the connector of the battery easily if the tool is used as shown in the image and it is lifted upward from the bottom.
Since the tool used is a plastic product, there is no problem, but please do not remove the tip of the driver or tweezers by mistake.
If you are used to disassembly, you will know what it means, but if you come into contact with the iron part, it may be short-circuited, so the worst power will not turn on.
- [Nexus 7 2013 LCD replacement and decomposition method STEP 8]

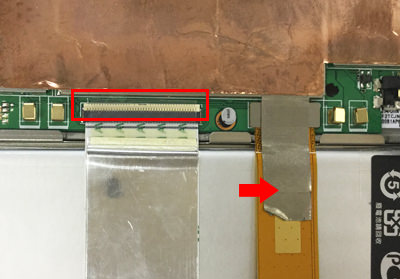
- There are two wires on top of the battery, and I want to remove it because I cannot remove the battery unless I remove this cable.The part that is enclosed in a red frame can be removed by causing a cream-colored nail and then sliding the cable.
The orange cable side has a tape on the arrow part, so it is peeled off.
- [Nexus 7 2013 LCD replacement and decomposition method STEP 9]

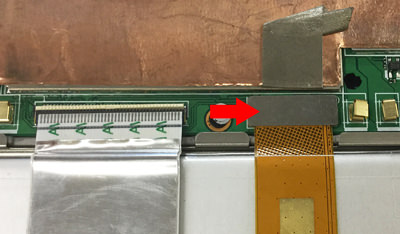
- Because there is a connector below when it is possible to peel off the tape of the previous, it is possible to remove the connector if it wakes up from the bottom.
- [Nexus 7 2013 LCD replacement and decomposition method STEP 10]

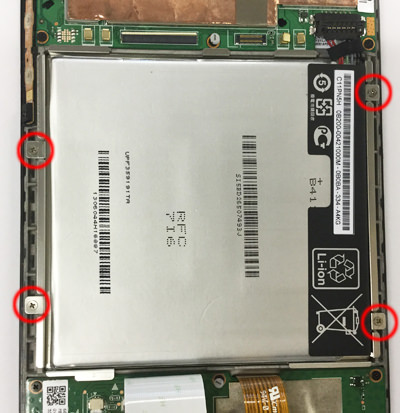
- The battery itself is secured with four screws, so use a Phillips screwdriver to remove all screws.
After removing the screw, you can easily remove the battery by lifting it up.
- [Nexus 7 2013 LCD replacement and decomposition method STEP 11]
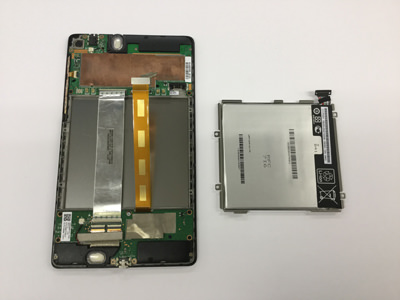
- Only the battery was removed from the Nexus 7 body.
- [Nexus 7 2013 Decomposition Method STEP 12]

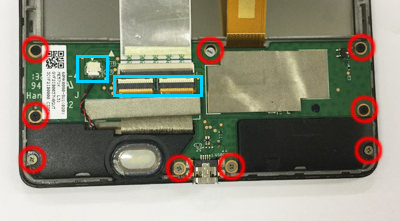
- This part is the underside of the Nexus 7.
There is a base (motherboard) and speakers, but let's remove all screws that are enclosed in red circles.
Because the speaker is contained under the base (motherboard), it is a flow to remove the speaker after removing the base first.
There is a connector in the blue frame part, but the left blue frame pulls out the connector, and the connector on the right side can be removed by pulling out the cable after causing the nail in the manner when the wiring of the battery is removed.
Lift the nail (cream color) of the connector where the wiring is stuck to 90 degrees, and then remove the cable.
- [Nexus 7 2013 LCD replacement and decomposition method STEP 13]
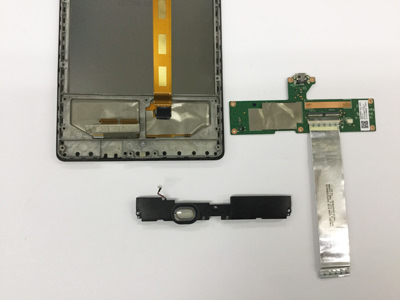
- It looks like you can remove the base and speakers.
- [Nexus 7 2013 LCD replacement and decomposition method STEP 14]

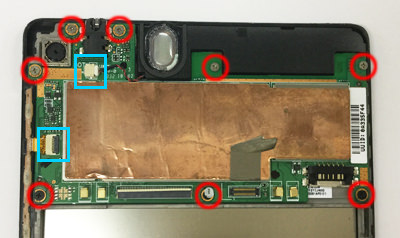
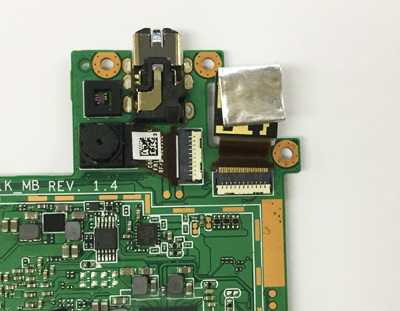
- This will be the upper side (camera side), but the red circle part will be a screw, and the blue frame part will be a connector as if the base of the lower side was removed, so remove it in the manner above, respectively.
- [Nexus 7 2013 LCD replacement and decomposition method STEP 15]
- I was able to remove the base on the upper side.
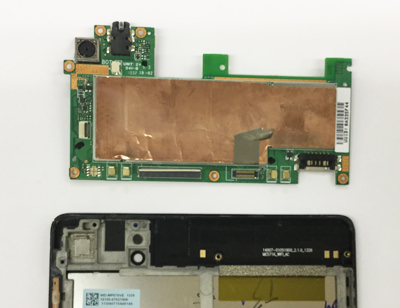
- [Nexus 7 2013 LCD replacement and decomposition method STEP 16]

- This part is a flat cable that was attached to the side when the upper base of the previous part was removed.
It is a cable that serves as a power button and a volume button, but because it is glued to the main body with double-sided tape, it is easy to peel off when heat is applied with a dryer or heat gun lightly.
After adding heat, it is easy to peel off if you use a spatula like the image.
- [Nexus 7 2013 LCD replacement and decomposition method STEP 17]
- The front camera and the in-camera are connected to the base removed by STEP 15, so let's remove each!
Both are able to be easily removed by lifting the cream-colored nails and then sliding the cable.
- [Nexus 7 2013 LCD replacement and decomposition method STEP 18]
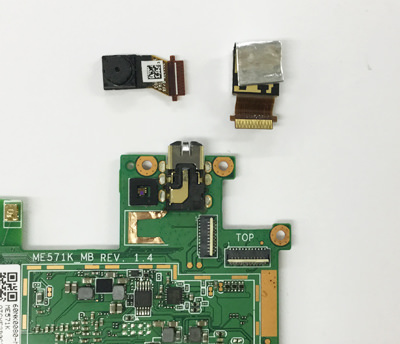
- The front camera and the in-camera were able to be removed from the base.
The decomposition method of Nexus 7 is completed, but in the future, the decomposition method when the liquid crystal is broken is also scheduled to be released, so please wait for a while.