ASUS Google Tablet Nexus 7 We have disassembled the 2012 model!
[Nexus 7 2012 LCD replacement and decomposition method STEP 1]
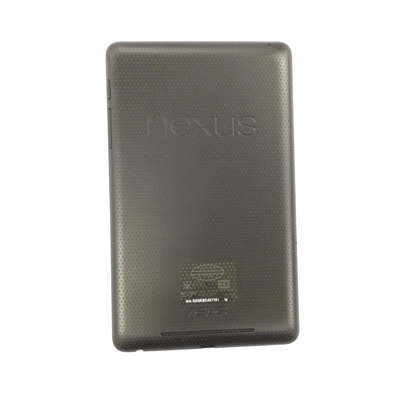
We have disassembled the Nexus 7 2012 model year.
By performing this decomposition method, you can change the LCD, battery, dock connector, earphone, camera, and replace the motherboard.
Nexus 7 is a terminal that can be repaired without problems if you are skillful because it has become easier to disassemble compared to other tablets, but if you do not have yourself in disassembly, please ask a repair agent!
You can buy any of the tools you need to disassemble at the home center, but if you have a thin Phillips screwdriver and a plastic spatula, you can disassemble them, so please try it!
[Nexus 7 2012 LCD replacement and decomposition method STEP 2]
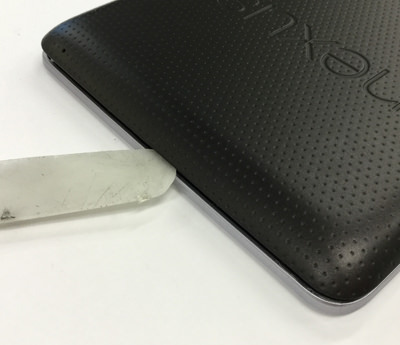
First of all, i enter from the place where I remove the back panel of the Nexus7, but I use the tool as shown in the image.
This tool is used when disassembling the iPhone, but as a substitute, it is such as a caulking spatula sold at the home center.
I think that it is possible to decompose to some extent if it is a person with a long nail if it decomposes without spending money.
If there is a little gap between the lcd and the rear panel, you can break down by sandwiching the card and so on and repeating the work.
(There are no screws on the back side of the main body.))
[Nexus 7 2012 LCD replacement and decomposition method STEP 3]
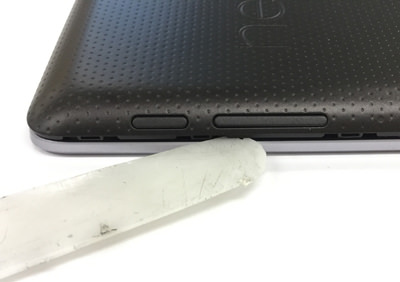
The image is in a state where the tool is sandwiched between the gap ed.
I think this is essential because the iPad is fixed with a powerful double-sided tape, but the rear panel of the Nexus 7 2012 model is not tape, This work will not be necessary especially if it is possible to remove the cover to some extent because it is fixed only with plastic claws.
I think that it is not so difficult even if there is no decomposition of the precision equipment because there is no screw at all.
On the other hand, if this work is not possible, it is not possible to proceed with any decomposition.
[Nexus 7 2012 LCD replacement and decomposition method STEP 4]
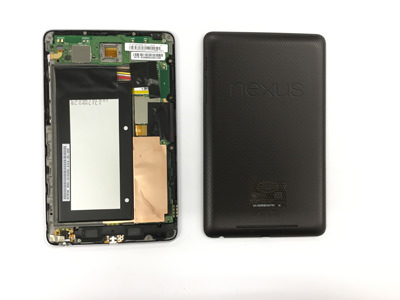
The back cover of the Nexus 7 could be removed.
Especially, wiring etc. can be easily removed because it is not on the cover side.
[Nexus 7 2012 LCD replacement and decomposition method STEP 5]
In the image, the battery and the motherboard are connected, but the connector is hidden by black tape, so let's peel off the black seal.
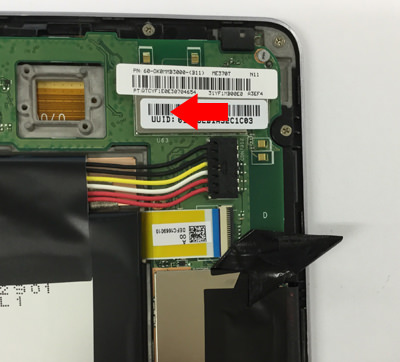
[Nexus 7 2012 LCD replacement and decomposition method STEP 6]
I think that it became the state of the image when it is possible to peel off the black tape of the previous, but the connector can be easily removed by pulling from right to left.
When removing red, because the wiring will come out if you pull it with a cable part such as a red, shiro, always hold the tip of the connector (black plastic part), let's pull out evenly put force!
[Nexus 7 2012 LCD replacement and decomposition method STEP 7]
The battery connector could be removed from the motherboard.
Regardless of the Nexus 7, the first priority is to remove the battery when replacing the car's battery or disassembling the machine.
Please note that if you proceed with the disassembly without doing this work, you may short-circuit at some timing.
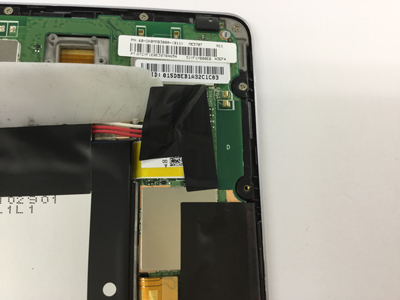
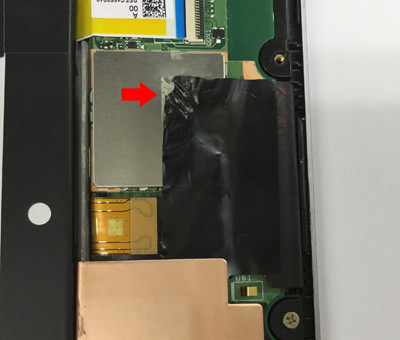
[Nexus 7 2012 LCD replacement and decomposition method STEP 8]
The cable of the liquid crystal panel is hidden in this part.
It is hidden with black tape just like the battery part of the previous, so let's peel off the tape.
As you can see in the decomposition so far, a lot of black tape is pasted in various places, but if you reuse it, it can be diverted if there is a Kapton tape (heat-resistant tape) etc. because the adhesive weakens considerably.
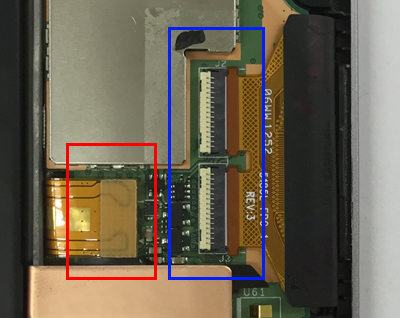
[Nexus 7 2012 LCD replacement and decomposition method STEP 9]
There are two connectors roughly when you can peel off the black tape, but you can remove the connector if you lift the left side (red) from the bottom to the top.
If you've ever disassembled your iPhone yourself, you probably have a plastic tool, but it's very useful to use that tool.
The connector on the right side (blue) is made to be able to remove it easily by making the cable (brown) slide after causing a white nail.
Please note that white plastic nails will break if you try to cause them to cause them because they are not made too strong as strength.
If the nail breaks by any chance, the only way is to fix it so that the cable does not move with the worst tape.
[Nexus 7 2012 LCD replacement and decomposition method STEP 10]
The connectors on the lcd panel sofan s of the previous LCD panel come off in this way.
I think that the connector on the left side of the image is not a problem at all, but please note that if you plug the cable on the right side, the cable will break or break if you do not insert both at the same time instead of inserting one at a time.
[Nexus 7 2012 LCD replacement and decomposition method STEP 11]
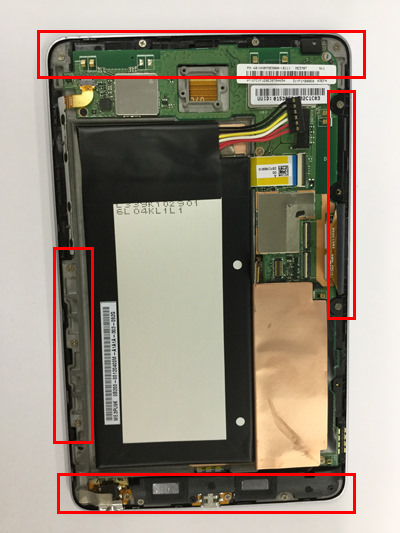
Because there are a lot of screws in this process, please do not lose it.
Because there is a screw in the part which is enclosed in red, I try to remove all, but if you do not know the location of the screw, there is no problem even if you remove all the screws that enter the eye.
[Nexus 7 2012 LCD replacement and decomposition method STEP 12]
There is a gray tape next to the earphone, but there is a screw under the tape, so you must remember to remove it.
When you break down, you may feel stiff, but there are screws in the parts that you do not notice, so do not try to proceed with the decomposition forcibly, please check well.
There is a risk that the foundation will break or the exterior parts will break if you forcibly disassemble.
[Nexus 7 2012 LCD replacement and decomposition method STEP 13]
Since the battery is only fixed with light double-sided tape, you can easily remove it if you insert the tool down as shown in the image.
If the double-sided tape is hard, it will be easier to remove it if you warm it lightly with a dryer and let the double-sided tape soften.
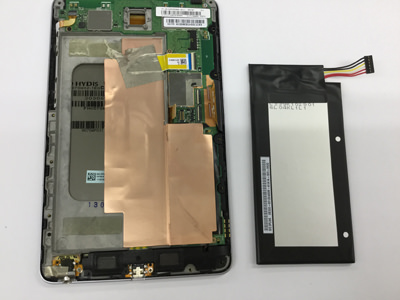
[Nexus 7 2012 LCD replacement and decomposition method STEP 14]
Only the battery was able to be removed from the main unit.
Battery is genuine, there is such as compatible products, if you use a compatible product in the battery replacement, please check the voltage, ampere, etc.
In addition to the battery, please check the voltage also when using compatible products with AC adapters.
Even if you can charge a battery with a different voltage or AC adapter at that time, it is not recommended because the load is applied to the main body little by little.
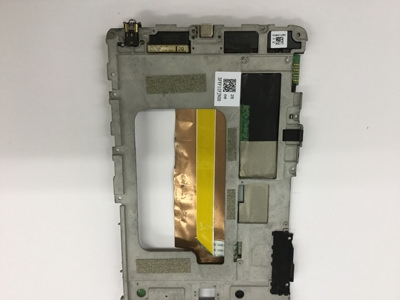
[Nexus 7 2012 LCD replacement and decomposition method STEP 15]
The bottom of the previous battery becomes the image part, but there is a bronze tape, so i insert the tool down and peel it off.
In addition, this bronze copper tape will be reused, so please remove it cleanly.
Once completed, it will be possible to separate the liquid crystal side and the main body side.
[Nexus 7 2012 LCD replacement and decomposition method STEP 16]
The liquid crystal and the main body were secured with screws to the frame, but if all screws are removed, it can be easily removed by hand.
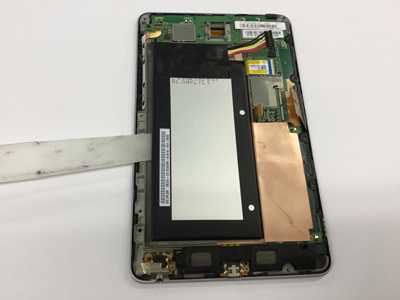
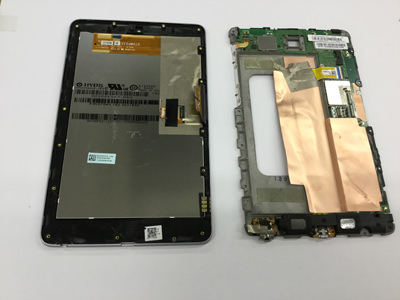
[Nexus 7 2012 LCD replacement and decomposition method STEP 17]
It was possible to separate the liquid crystal side and the main body side.
The left part becomes liquid crystal glass and panel part, but replaces this part if the glass breaks or the screen line enters.
If you have the right foundation, please be careful when handling it because it reuses it.
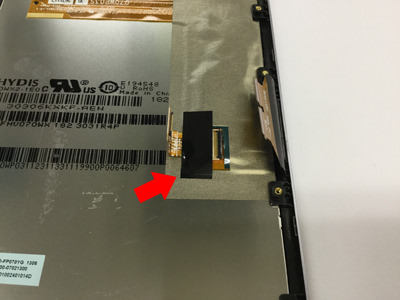
[Nexus 7 2012 LCD replacement and decomposition method STEP 18]
This image is the back of the LCD panel that was removed earlier, but when replacing parts due to liquid crystal cracking, some cables must be replaced and ported to the new panel.
There is a black tape in the red arrow part, so let's peel it off.
Because the connector connection part comes into view when it peels off, it is possible to remove the cable easily if you cause a black nail and slide it.
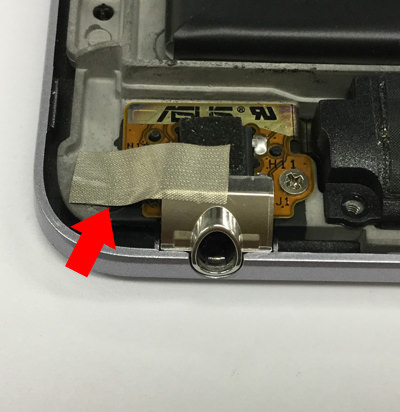
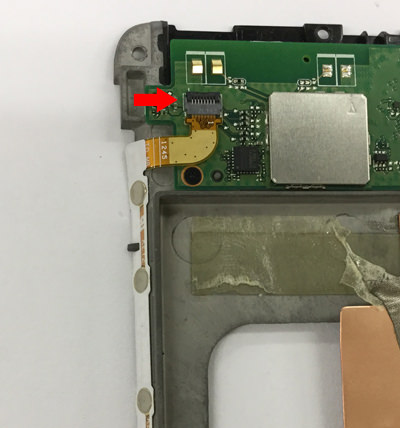
[Nexus 7 2012 LCD replacement and decomposition method STEP 19]
This part is a power switch and a volume switch, but it is connected by a flat cable to the connector part of the red arrow.
You can remove it if you pull out the cable after causing a black nail as before.
Please be careful because it will crack if you put too much force and raise the nail.
The angle of the nail is about 90 degrees to 100 degrees.
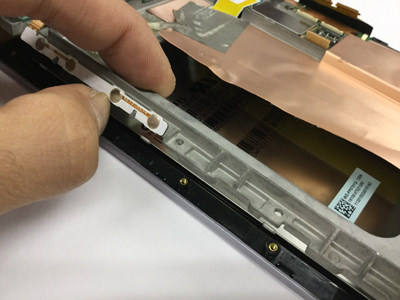
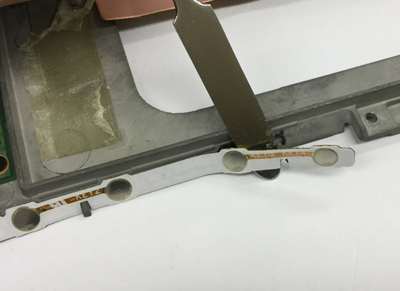
[Nexus 7 2012 LCD replacement and decomposition method STEP 20]
The power switch and the volume switch are fixed with double-sided tape, but it can be easily peeled off by using a tool such as the image.
If the double-sided tape is hard, there is a possibility that it will break if you remove it forcibly, so if it is hard, you can clearly see the difference when you apply warm air with a dryer and then do the same work.
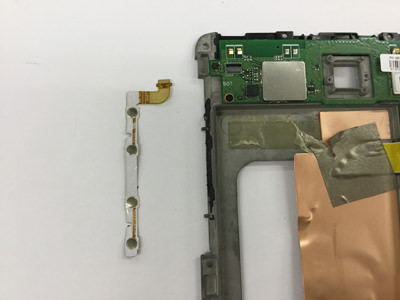
[Nexus 7 2012 LCD replacement and decomposition method STEP 21]
The power switch and volume switch part could be removed.
Because the part is all over, if the power is turned on but the volume does not work, replace this part and fix it.
However, if it is not fixed, the motherboard failure becomes thick, but the Nexus 7 is easy to isolate the failure because the making is quite simple.
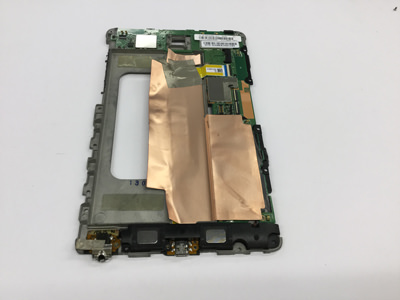
[Nexus 7 2012 LCD replacement and decomposition method STEP 22]
The remaining parts on the main body side will be cameras, dock connectors, earphones, speakers, but it is very easy to disassemble up to this point.
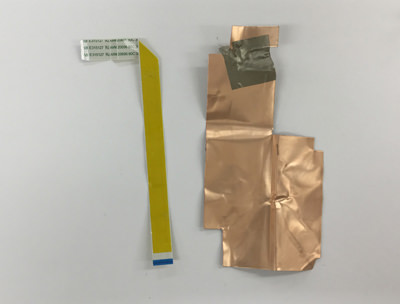
First of all, I would like to remove it from the dock connector, but the cable connecting the dock connector and the motherboard is hidden by a copper seal.
[Nexus 7 2012 LCD replacement and decomposition method STEP 23]
It is very easy to understand when turning over, but the yellow cable and the copper part are fixed with light double-sided tape, so let's peel it off so as not to break it.
Because both of the legs are connected by a connector respectively, it is easier to work by removing the connector part before peeling off.
[Nexus 7 2012 LCD replacement and decomposition method STEP 24]
I was able to remove the cable.
The dock connector has not yet been removed, but the dock connector is hidden under the speaker, so the speaker will be removed first.
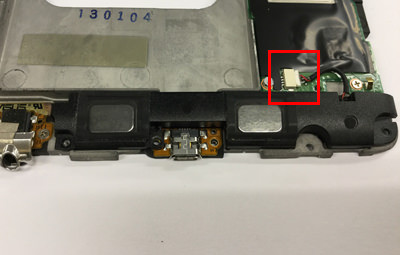
[Nexus 7 2012 LCD replacement and decomposition method STEP 25]
The speakers are black parts with dock connectors and earphones.
The part enclosed in the red frame connects the speaker and the motherboard, but it is possible to remove it easily by simply sliding the connector.
If you can remove the connector, you can easily remove it simply by lifting the speaker body.
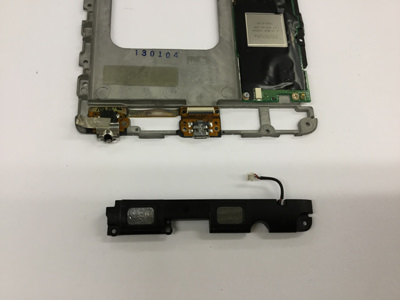
[Nexus 7 2012 LCD replacement and decomposition method STEP 26]
I was able to remove the speaker.
[Nexus 7 2012 LCD replacement and decomposition method STEP 27]
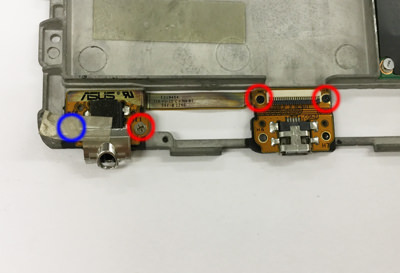
The image part becomes a dock connector, earphones, but the part itself becomes a whole area, so you will replace this part even if one of them has failed.
Because there is a small screw in the red circle part, there is the same screw in the blue circle part though it is made to remove it, but please do not forget to remove it because it is hidden by a gray seal.
[Nexus 7 2012 LCD replacement and decomposition method STEP 28]
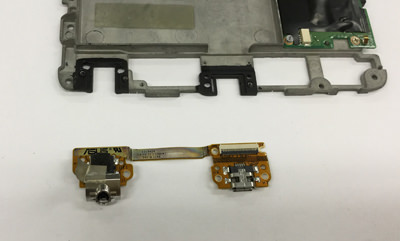
I was able to remove the dock connector and earphone part.
Because it is the same parts, it is necessary to replace each of these parts even if it is either failure.
[Nexus 7 2012 LCD replacement and decomposition method STEP 29]
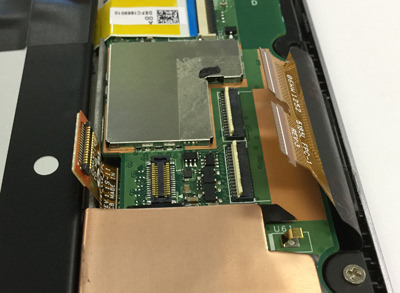
The main parts left in the disassembly so far are motherboards and in-cameras.
The in-camera cannot be removed unless the motherboard is removed, so remove the motherboard first.
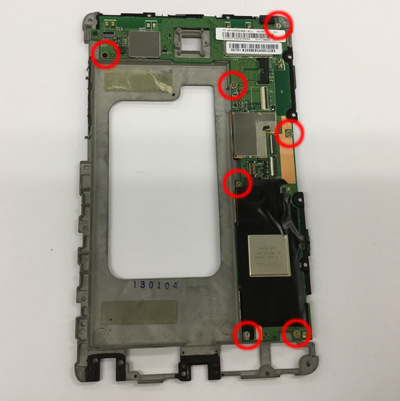
Because there is a screw in the red circle part, let's remove all!
[Nexus 7 2012 LCD replacement and decomposition method STEP 30]
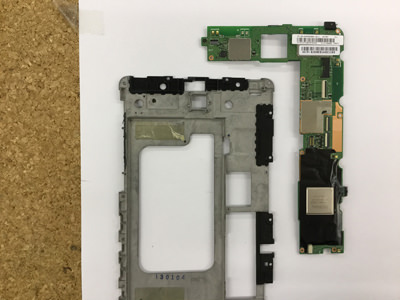
The motherboard could be removed from the main unit.
The motherboard is also used for Personal Computers and Macs other than Nexus 7, but since it is the most important part, it is necessary to handle it so as not to break down.
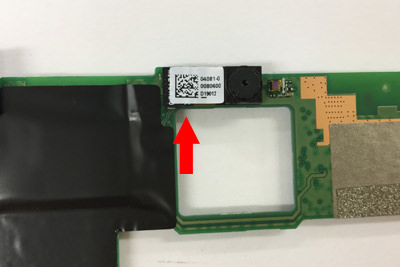
[Nexus 7 2012 LCD replacement and decomposition method STEP 31]
The in-camera may turn the motherboard inside out, but it is possible to remove it easily by lifting the connector of the arrow part upward.
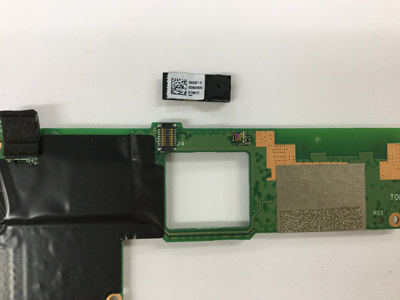
[Nexus 7 2012 LCD replacement and decomposition method STEP 32]
I was able to remove the in-camera, but removing it is easiest with Nexus7 2012.
As an aside, the Nexus7 2012 camera has only an in-camera and no rear camera, but this doesn't seem to be the camera originally attached to take the photo.
In-camera seems to be attached for the purpose, such as Skype and face authentication, but it seems to become a function as a camera by installing the app.